I recently ran into a very specific but frustrating UniFi routing issue.
I have a UniFi Cloud Gateway Fiber with several local networks, a built-in WireGuard VPN server for remote clients, and outbound WireGuard VPN client tunnels. UniFi’s Policy-Based Routing works well for normal local clients, but I discovered that remote WireGuard clients were not being treated the same way as local LAN clients.
The goal was simple:
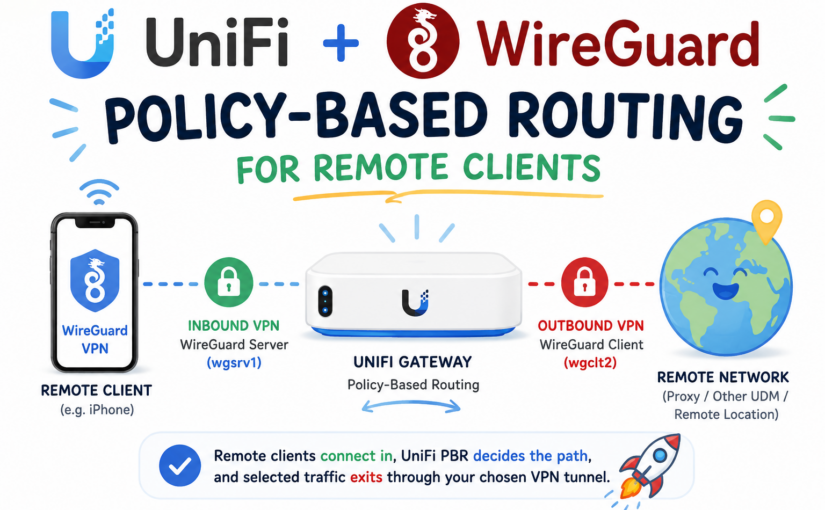
iPhone on WireGuard VPN
→ connects back to my UniFi gateway
→ traffic enters through the UniFi WireGuard server
→ UniFi Policy-Based Routing evaluates the traffic
→ selected traffic exits through an outbound WireGuard client tunnel
In my case, this was useful for things like Xfinity Stream, Netflix, and other location-sensitive streaming or app use cases where I may want certain traffic from my phone to appear as though it is coming from a specific home, proxy, or remote network location.
This post documents what I found, how I tested it, the one-line fix that worked in my environment, and how I made it persistent with a small systemd timer/watchdog.
Environment Tested
This fix was tested on:
Device: UniFi Cloud Gateway Fiber / UCG Fiber
UniFi OS: 5.1.11
UniFi Network Application: 10.4.57
Release Channel: Early Access
Auto Update: Off
Kernel: Linux 5.4.213-ui-ipq9574
Architecture: aarch64
Base OS: Debian GNU/Linux 11 (bullseye)
Date tested: May 18, 2026
This matters because UniFi OS and the UniFi Network application can change how interfaces, ipsets, firewall rules, and policy-based routing are generated.
A Note on How This Was Developed
This fix was developed and tested with the help of ChatGPT while working through the actual SSH output from my UniFi Cloud Gateway Fiber.
I would not recommend blindly copying these commands without first confirming your own network details. In my case, the fix came down to one simple command:
ipset add UBIOS4local_network 10.10.100.0/24 -existBut that command only makes sense because my UniFi WireGuard remote-access subnet is:
10.10.100.0/24and my UniFi PBR rules were using:
UBIOS4local_networkas part of their source matching.
Your interface names, WireGuard subnet, route tables, marks, and ipset names may be different. Before applying anything persistently, use the diagnostic commands below to confirm how your own UniFi gateway is configured.
This was one of those projects where ChatGPT was genuinely useful as a troubleshooting partner: not by guessing the answer, but by helping interpret the live UniFi routing tables, iptables rules, ipsets, WireGuard interfaces, and route tests until the actual missing piece became obvious.
The Use Case
I wanted remote WireGuard clients, such as an iPhone, to behave more like local network clients.
For example:
Remote iPhone
→ WireGuard VPN back to UniFi
→ UniFi PBR decides where traffic should go
→ some traffic exits normal WAN
→ some traffic exits through wgclt2
This is different from a basic VPN setup where all remote traffic simply exits the home WAN.
The specific goal was:
Remote WireGuard client traffic should be eligible for the same UniFi GUI Policy-Based Routing rules as local LAN traffic.That way I could keep using the UniFi Network application to define destination-based or domain-based PBR rules, instead of manually recreating all routing logic in iptables.
Important WireGuard Terminology in This Setup
There are two very different WireGuard roles on the UniFi gateway in this setup:
wgsrv1  = WireGuard SERVER interface on the UniFi gateway
wgclt1  = WireGuard CLIENT interface from the UniFi gateway to another endpoint
wgclt2  = another WireGuard CLIENT interface from the UniFi gateway to another endpoint
That distinction matters.
wgsrv1: Remote Clients Connecting Into the UniFi Gateway
wgsrv1 is the UniFi gateway acting as a WireGuard server.
This is what my iPhone, laptop, or other remote device connects into when I am away from home.
In my setup:
wgsrv1 = 10.10.100.1/24
Remote WireGuard clients = 10.10.100.x
So the inbound path looks like this:
iPhone / remote device
→ WireGuard tunnel over the internet
→ UniFi gateway
→ wgsrv1
→ source IP such as 10.10.100.2
This is the “road warrior” or remote-access VPN side.
wgclt1 / wgclt2: The UniFi Gateway Connecting Out to Other WireGuard Endpoints
wgclt1 and wgclt2 are different. These are the UniFi gateway acting as a WireGuard client.
That means the UDM / UCG itself initiates a WireGuard tunnel out to another endpoint, such as:
another UniFi gateway
a WireGuard server at another location
a VPS
a proxy endpoint
a commercial VPN provider
another home network
In my setup, the outbound tunnel I wanted to use for selected traffic was:
wgclt2So the outbound path looks like this:
UniFi gateway
→ wgclt2
→ remote WireGuard endpoint / proxy / other UDM
→ internet or remote network
The Full Hairpin Path
The full goal was to combine both sides:
iPhone away from home
→ connects into UniFi using WireGuard
→ enters the gateway on wgsrv1
→ UniFi PBR evaluates the traffic
→ selected traffic exits through wgclt2
→ remote WireGuard endpoint / proxy / other UDM
→ internet
So this is not simply:
Phone → home internetIt is more like:
Remote WireGuard client
→ home UniFi gateway
→ UniFi Policy-Based Routing
→ outbound WireGuard client tunnel
That is why the distinction between wgsrv1 and wgclt2 is so important.
My Network Layout
On my UniFi gateway, WireGuard had three relevant interfaces:
Inbound WireGuard server:
  wgsrv1 = 10.10.100.1/24

Outbound WireGuard client tunnels:
  wgclt1 = UniFi gateway connecting out to another WireGuard endpoint
  wgclt2 = UniFi gateway connecting out to another WireGuard endpoint
The important distinction is:
wgsrv1 receives remote VPN clients.
wgclt1 and wgclt2 are outbound VPN tunnels created by the UniFi gateway itself.
My remote WireGuard clients connect into wgsrv1 and receive IPs like:
10.10.100.2, 10.10.100.3, 10.10.100.4, 10.10.100.5, etc.My desired outbound VPN path for selected traffic was:
wgclt2So the full desired path was:
Remote iPhone / laptop
→ connects to UniFi WireGuard server
→ enters UniFi on wgsrv1
→ source is 10.10.100.x
→ UniFi PBR rules evaluate the destination
→ matching traffic exits through wgclt2
→ remote WireGuard endpoint / proxy / other UDM
In other words, wgsrv1 is the entrance tunnel, and wgclt2 is the selected exit tunnel.
Before You Copy This
The important concept is not the exact subnet I used. The concept is:
Find the WireGuard remote-access subnet
→ confirm it is not included in UniFi's local-network ipset
→ add that subnet to the IPv4 local-network ipset
→ verify that UniFi GUI PBR rules now apply
→ only then make it persistent
In my case:
WireGuard server interface: wgsrv1
WireGuard server IP:        10.10.100.1/24
Remote WG client subnet:    10.10.100.0/24
Outbound WG client tunnel:  wgclt2
Target route table:         178.wgclt2
If your WireGuard server subnet is different, change the script variables accordingly:
WG_SUBNET="10.10.100.0/24"
TEST_IP="10.10.100.2"
SET_NAME="UBIOS4local_network"
The Problem
UniFi had already created the PBR rules correctly for local clients.
The relevant UniFi PBR rules looked conceptually like this:
If source is in UBIOS_local_network
AND destination matches one of the UniFi traffic-route destination sets
THEN mark the packet for wgclt2
The problem was that the remote WireGuard client subnet:
10.10.100.0/24was not considered part of UniFi’s local network ipset.
So traffic from a remote WireGuard client entered the gateway, but it did not match the normal UniFi GUI Policy-Based Routing source condition.
In other words:
Local LAN clients matched PBR.
Remote WireGuard clients did not.
Discovering the WireGuard Interfaces
SSH into the UniFi gateway:
ssh root@<gateway-ip>Then list network interfaces:
ls /sys/class/netUseful WireGuard status command:
wg showIn my case, I saw:
wgclt1
wgclt2
wgsrv1
Where:
wgsrv1 = UniFi WireGuard server for remote clients
wgclt2 = outbound WireGuard client tunnel
I also checked interface addressing:
ip -br addrRelevant output:
wgclt1   192.168.131.3/32
wgclt2   192.168.234.3/32
wgsrv1   10.10.100.1/24
That confirmed the remote WireGuard server subnet was:
10.10.100.0/24Checking UniFi’s Routing Tables
These commands helped reveal how UniFi was routing marked traffic:
ip rule show
ip route show table all | grep -Ei 'default|wgclt|wgsrv|eth|table'
The key result was:
default dev wgclt2 table 178.wgclt2And the policy rule showed that marked traffic could be routed to that table.
Testing a forwarded packet entering from the WireGuard server interface confirmed the route:
ip route get 1.1.1.1 from 10.10.100.2 iif wgsrv1 mark 0x6a0000Expected result:
1.1.1.1 from 10.10.100.2 dev wgclt2 table 178.wgclt2 mark 0x6a0000
    cache iif wgsrv1
That proved the route itself worked.
The missing piece was getting the remote WireGuard clients to match UniFi’s PBR source rules.
Checking UniFi’s Local Network ipset
UniFi uses ipsets as part of its firewall and PBR logic.
I checked the parent local-network set:
ipset list UBIOS_local_networkIt showed:
Name: UBIOS_local_network
Type: list:set
Members:
UBIOS4local_network
UBIOS6local_network
So IPv4 local networks are actually in:
UBIOS4local_networkI tested whether my remote WireGuard clients were considered local:
ipset test UBIOS4local_network 10.10.100.2
ipset test UBIOS4local_network 10.10.100.3
ipset test UBIOS4local_network 10.10.100.5
They were not. That explained why PBR did not apply.
The One-Line Fix in My Environment
After confirming the routing and ipset behavior, the actual fix in my environment was:
ipset add UBIOS4local_network 10.10.100.0/24 -existThis added my WireGuard remote-access subnet to UniFi’s IPv4 local-network ipset.
That made remote WireGuard clients eligible for the same UniFi GUI Policy-Based Routing rules as my local LAN clients.
Again, do not assume 10.10.100.0/24 is correct for your setup. Confirm your WireGuard server subnet first.
After running that command, I verified:
ipset test UBIOS4local_network 10.10.100.2Expected result:
10.10.100.2 is in set UBIOS4local_network.Then I tested routing again:
ip route get 1.1.1.1 from 10.10.100.2 iif wgsrv1 mark 0x6a0000Expected:
1.1.1.1 from 10.10.100.2 dev wgclt2 table 178.wgclt2 mark 0x6a0000
    cache iif wgsrv1
At that point, the remote WireGuard client traffic began following my existing UniFi GUI PBR rules.
Why This Works
UniFi’s PBR rules were already doing most of the work.
The relevant flow became:
Remote WireGuard client
→ source 10.10.100.x
→ now included in UBIOS4local_network
→ matches UniFi PBR source condition
→ destination matches UniFi traffic-route ipset
→ packet gets marked
→ marked packet routes to wgclt2
→ UniFi NAT masquerades traffic out wgclt2
The beauty of this approach is that I did not have to recreate all of my PBR rules manually.
UniFi still manages:
destination IP sets
domain-derived IP sets
packet marking
routing table selection
NAT out wgclt+
MSS clamping
The only manual change is making the remote WireGuard subnet count as a local IPv4 source for PBR.
Testing Live Traffic
To watch PBR counters:
iptables -t mangle -L UBIOS_PREROUTING_PBR -v -nThen generate traffic from the remote WireGuard client to a destination covered by a PBR rule.
Run the counter command again:
iptables -t mangle -L UBIOS_PREROUTING_PBR -v -nYou should see counters increase on rules involving:
UBIOS_trafficroute_ip_*
UBIOS_trafficroute_dn_*
You can also watch packets live.
In one SSH window:
tcpdump -ni wgsrv1 host 10.10.100.2In another SSH window:
tcpdump -ni wgclt2Expected behavior:
Traffic enters on wgsrv1 from the remote client.
Matched PBR traffic exits on wgclt2.
Monitoring and Debugging Live Traffic
One thing that made this harder to troubleshoot is that the UniFi Network UI did not clearly show when these PBR rules were being triggered.
In the past, UniFi’s traffic route / PBR display seemed to show rule activity more clearly. In this case, the UI did not reliably show that the PBR rules were being matched, even though the routing was actually working. That may be a UniFi bug, a limitation of the current Network application version, or just a gap in how the UI reports traffic from WireGuard remote-access clients.
The good news is that you can confirm what is happening directly over SSH.
Watch the UniFi PBR Counters
This command shows packet and byte counters for UniFi’s PBR mangle chain:
iptables -t mangle -L UBIOS_PREROUTING_PBR -v -nBefore testing from the remote WireGuard client, run:
iptables -t mangle -L UBIOS_PREROUTING_PBR -v -nThen generate traffic from the remote client, such as opening the app or website that should match your PBR rule.
Then run it again:
iptables -t mangle -L UBIOS_PREROUTING_PBR -v -nYou are looking for increasing packet and byte counters on rules involving:
UBIOS_trafficroute_ip_*
UBIOS_trafficroute_dn_*
Those are the UniFi-created destination sets for traffic routes / policy-based routing.
Watch Counters Continuously
To watch the counters update in near real time:
watch -n 1 'iptables -t mangle -L UBIOS_PREROUTING_PBR -v -n | head -100'Then use the remote WireGuard client and watch for counters to increase.
This was more useful than the UniFi UI because it showed whether the firewall/PBR rules were actually being hit.
Monitor Traffic Entering from the Remote WireGuard Client
In one SSH window, watch traffic entering from the remote WireGuard client on the WireGuard server interface:
tcpdump -ni wgsrv1 host 10.10.100.2Replace 10.10.100.2 with the IP of your remote WireGuard client.
This confirms that traffic from the remote client is entering the UniFi gateway through wgsrv1.
Monitor Traffic Exiting the Outbound WireGuard Client Tunnel
In a second SSH window, watch traffic exiting the outbound WireGuard client tunnel:
tcpdump -ni wgclt2Then generate traffic from the remote WireGuard client to a destination covered by your PBR rule.
Expected behavior:
Traffic enters on wgsrv1 from 10.10.100.2.
Matched PBR traffic exits through wgclt2.
That proves the full path:
Remote WireGuard client
→ wgsrv1
→ UniFi PBR match
→ wgclt2
Confirm the Route for Marked Traffic
This command simulates a forwarded packet from the remote WireGuard client entering on wgsrv1 with the UniFi PBR mark:
ip route get 1.1.1.1 from 10.10.100.2 iif wgsrv1 mark 0x6a0000In my case, the expected result was:
1.1.1.1 from 10.10.100.2 dev wgclt2 table 178.wgclt2 mark 0x6a0000
    cache iif wgsrv1
That output confirms that marked traffic from the remote WireGuard client will use the wgclt2 route table.
Confirm the WireGuard Subnet Is Still in the Local ipset
Since the entire fix depends on the remote WireGuard subnet being included in UniFi’s IPv4 local-network ipset, this is the quick check:
ipset test UBIOS4local_network 10.10.100.2Expected:
10.10.100.2 is in set UBIOS4local_network.If it is not in the set, re-run the fix:
ipset add UBIOS4local_network 10.10.100.0/24 -existor start the persistent service:
systemctl start wg-pbr-fix.serviceFull Debugging Block
This is a useful all-in-one check:
echo "=== Timer status ==="
systemctl is-active wg-pbr-fix.timer
systemctl is-enabled wg-pbr-fix.timer

echo
echo "=== Is remote WG client treated as local? ==="
ipset test UBIOS4local_network 10.10.100.2 2>&1

echo
echo "=== Does marked traffic route out wgclt2? ==="
ip route get 1.1.1.1 from 10.10.100.2 iif wgsrv1 mark 0x6a0000

echo
echo "=== UniFi PBR counters ==="
iptables -t mangle -L UBIOS_PREROUTING_PBR -v -n | head -100
Expected high-level result:
Timer is active/enabled.
10.10.100.2 is in UBIOS4local_network.
Marked traffic from wgsrv1 routes out wgclt2.
PBR counters increase when matching traffic is generated.
This debugging is especially helpful because the UniFi Network UI may not accurately show that a traffic route has been triggered, even when the underlying iptables and routing behavior is working correctly.
Making It Persistent
The one-line fix works, but it will not necessarily survive:
reboot
UniFi Network restart
firewall rule regeneration
PBR changes
VPN changes
firmware updates
So I created a small script and systemd timer.
The timer checks every five minutes and re-adds the subnet only if UniFi has removed it.
Create the Script
mkdir -p /data/scripts

cat > /data/scripts/fix-wg-pbr-local.sh <<'EOF'
#!/bin/sh

WG_SUBNET="10.10.100.0/24"
TEST_IP="10.10.100.2"
SET_NAME="UBIOS4local_network"

# Exit quietly if UniFi has not created the ipset yet.
ipset list "$SET_NAME" >/dev/null 2>&1 || exit 0

# If the test IP is already covered, do nothing.
if ipset test "$SET_NAME" "$TEST_IP" >/dev/null 2>&1; then
  exit 0
fi

# Otherwise re-add the whole WireGuard remote-access subnet.
ipset add "$SET_NAME" "$WG_SUBNET" -exist 2>/dev/null
logger -t wg-pbr-fix "Added $WG_SUBNET to $SET_NAME"
exit 0
EOF

chmod +x /data/scripts/fix-wg-pbr-local.sh
Create the systemd Service
cat > /etc/systemd/system/wg-pbr-fix.service <<'EOF'
[Unit]
Description=Ensure WireGuard remote-access subnet is eligible for UniFi PBR
After=network-online.target
Wants=network-online.target

[Service]
Type=oneshot
ExecStart=/data/scripts/fix-wg-pbr-local.sh
EOF
Create the 5-Minute Timer
cat > /etc/systemd/system/wg-pbr-fix.timer <<'EOF'
[Unit]
Description=Periodically check WireGuard remote-access subnet in UniFi PBR local ipset

[Timer]
OnBootSec=2min
OnUnitActiveSec=5min
Unit=wg-pbr-fix.service

[Install]
WantedBy=timers.target
EOF
Enable the Timer
systemctl daemon-reload
systemctl enable --now wg-pbr-fix.timer
systemctl start wg-pbr-fix.service
Verifying the Timer
Check that the timer is active:
systemctl is-active wg-pbr-fix.timer
systemctl is-enabled wg-pbr-fix.timer
Expected:
active
enabled
See the schedule:
systemctl list-timers | grep wg-pbrCheck the last service run:
systemctl status wg-pbr-fix.serviceFor a oneshot service, this is normal:
Active: inactive (dead)
code=exited, status=0/SUCCESS
TriggeredBy: wg-pbr-fix.timer
It runs, exits, and waits for the timer to call it again.
Verify the actual fix:
ipset test UBIOS4local_network 10.10.100.2Expected:
10.10.100.2 is in set UBIOS4local_network.Verify routing:
ip route get 1.1.1.1 from 10.10.100.2 iif wgsrv1 mark 0x6a0000Expected:
1.1.1.1 from 10.10.100.2 dev wgclt2 table 178.wgclt2 mark 0x6a0000
    cache iif wgsrv1
Proof the Watchdog Works
After creating the service and timer, I verified the timer was active:
systemctl is-active wg-pbr-fix.timer
systemctl is-enabled wg-pbr-fix.timer
Expected:
active
enabled
I also checked the timer schedule:
systemctl list-timers | grep wg-pbrExample output:
Mon 2026-05-18 13:38:39 EDT 3min 10s left Mon 2026-05-18 13:33:39 EDT 1min 49s ago wg-pbr-fix.timer wg-pbr-fix.serviceThen I manually removed the WireGuard subnet from UniFi’s IPv4 local-network ipset:
ipset del UBIOS4local_network 10.10.100.0/24Confirmed it was gone:
ipset test UBIOS4local_network 10.10.100.2Expected:
10.10.100.2 is NOT in set UBIOS4local_network.Then I manually started the service:
systemctl start wg-pbr-fix.serviceAnd confirmed the subnet was re-added:
ipset test UBIOS4local_network 10.10.100.2Expected:
10.10.100.2 is in set UBIOS4local_network.Finally, I confirmed that marked traffic from the remote WireGuard client would route out the outbound WireGuard client tunnel:
ip route get 1.1.1.1 from 10.10.100.2 iif wgsrv1 mark 0x6a0000Expected:
1.1.1.1 from 10.10.100.2 dev wgclt2 table 178.wgclt2 mark 0x6a0000
    cache iif wgsrv1
Final Health Check
After reboot or UniFi updates, these are the quick checks:
systemctl is-active wg-pbr-fix.timer
ipset test UBIOS4local_network 10.10.100.2
ip route get 1.1.1.1 from 10.10.100.2 iif wgsrv1 mark 0x6a0000
Expected results:
active

10.10.100.2 is in set UBIOS4local_network.

1.1.1.1 from 10.10.100.2 dev wgclt2 table 178.wgclt2 mark 0x6a0000
    cache iif wgsrv1
Rollback
To remove the persistent fix:
systemctl disable --now wg-pbr-fix.timer
rm -f /etc/systemd/system/wg-pbr-fix.timer
rm -f /etc/systemd/system/wg-pbr-fix.service
rm -f /data/scripts/fix-wg-pbr-local.sh
systemctl daemon-reload
Remove the ipset entry:
ipset del UBIOS4local_network 10.10.100.0/24 2>/dev/nullImportant Caveats
This is an SSH-level workaround. It is not an official UniFi feature.
A few important notes:
This may break after UniFi OS or Network application updates.
Your interface names may differ.
Your WireGuard subnet may differ.
Your PBR mark/table may differ.
You should test before making it persistent.
This was tested on UniFi OS 5.1.11 with UniFi Network 10.4.57 on the Early Access channel. Future official or early-access releases may change the ipset names, firewall chains, routing table names, or PBR marks. Verify your own environment before applying the persistent service.
Do not blindly copy my subnet unless your WireGuard server is also using:
10.10.100.0/24Adjust these values for your environment:
WG_SUBNET="10.10.100.0/24"
TEST_IP="10.10.100.2"
SET_NAME="UBIOS4local_network"
Conclusion
This ended up being a very clean fix.
The issue was not that UniFi could not route the traffic.
The issue was that remote WireGuard clients were not included in the local-network ipset that UniFi’s PBR rules use for source matching.
By adding:
ipset add UBIOS4local_network 10.10.100.0/24 -existremote WireGuard clients became eligible for the same GUI-created PBR rules as local clients.
The final working path is:
iPhone / remote WireGuard client
→ connects into UniFi WireGuard server
→ enters on wgsrv1
→ source IP is 10.10.100.x
→ source is now included in UBIOS4local_network
→ UniFi GUI PBR destination rules apply
→ matching traffic is marked for wgclt2
→ traffic exits through the UniFi gateway's outbound WireGuard client tunnel
→ remote WireGuard endpoint / proxy / other UDM
The key idea is that wgsrv1 and wgclt2 are opposite sides of the flow:
wgsrv1 = remote clients come in
wgclt2 = selected traffic goes back out
That allows remote clients to come back through the UniFi gateway and still benefit from selective Policy-Based Routing, including use cases like Xfinity Stream, Netflix, and other location-sensitive traffic.