Safely grant only your PowerShell session “bypass” permission; “the file is not digitally signed. You cannot run this script on the current system.”

In short, this is my future quick reference:

Set-ExecutionPolicy -Scope Process -ExecutionPolicy Bypass

This sets the execution policy for only this session (process) of PowerShell and do not make the change permanent.

In contract, do not run:

Set-ExecutionPolicy RemoteSigned

This will set the policy for your LocalMachine, leaving you open to malicious PowerShell scripts in the future. Don’t do it.

See more here, here, and here if you want more information.

(I most recently used this “byass” for this excellent Exchange script to export all of our internal Distribution groups with one simple command)

RDS 2012 Certificates. SSO. A website is trying to run a RemoteApp program.

The goal was to remove this dreaded end-user dialogue box:
A website is trying to run a RemoteApp program. Make sure that you trust the publisher before you connect to run the program.

Simple right? Wrong; especially when I came across many blogs attempting to address RDS certificate issues. This one post gets you 90% there but was not complete. Specifically, see the red section below.
Steps:

  1. Get a certificate (in my case, a GoDaddy wildcard cert)
  2. Assign the certificate to the RDS roles. Refer to this great post with screen shots.
  3. Extract the certificate thumbprint, remove the “Get-Childitem Cert:\LocalMachine\My” PowerShell command on your RDS server or follow the steps outlined on Morgan Simonsen’s blog. Make sure you properly format the thumbprint: no spaces, all caps.
  4. Create and assign a GPO for the following settings:
    1. Computer Configuration > Policies > Administrative Templates > Windows Components > Remote Desktop Services > Remote Desktop Connection Client > “Specify SHA1 thumbprints of certificates representing trusted .rdp publishers”.
      Under Options, paste the formatted thumbprint.
      Specify SHA1 thumbprints of certificates representing trusted .rdp publishers
    2. Computer Configuration > Policies > Administrative Templates > Windows Components > Remote Desktop Services > Remote Desktop Connection Client > “Allow .rdp files from valid publishers and user’s default .rdp settings”.
      Enable.
    3. Computer Configuration > Policies > Administrative Templates > System > Credentials Delegation > “Allow Delegating Default Credentials > “Allow Delegating Default Credentials”.
      Enable and add “TERMSRV/<insert your RDS gateway/server name>” (refer to the example text in the GPO editor).
      Allow Delegating Default Credentials 
    4. Yet after repeated gpupdate /force and a full reset of IE settings, the dialogue warning persisted. Then I stumbled across these two nuggets: here combined with 2nd post down here. The “Specify SHA1…” GPO was not adding the proper “PublisherBypassList” keys.
      The solution? Manually adding the “HKEY_CURRENT_USER\Software\Microsoft\Terminal Server Client\PublisherBypassList” as a User Configuration GPO registry update.
      PublisherBypassList GPO
      Notice the key is the thumbprint above with an additional “00” placed at the end.
      PublisherBypassList regedit
      The easiest way to verify the key is to check the “Do not remind me….” on the RDS prompt. It will save the thumbprint for you in the proper format.
  5. For icing on the cake, enable single sign-on; see this excellent blog post or the official MSDN blog post“.

Enjoy. SSO RDS connections with no dialogue boxes or end-user warnings or prompts.

5GHz Wireless Client Bridges & Turning back the clock: Convert a WRT610N v2 to E3000

My Linksys E3000 dual radio wireless router was finally retired last week for a Netgear Nighthawk R7000. In the early days I ran DD-WRT exclusively, but in the last two years I have split between Tomato (Shibby) and DD-WRT depending on application (i.e. Tomato as router, DD-WRT for wireless briges, repeaters).

E3000 vs. R7000(Table courtesy of Wiki Devi).
For a router released in early 2010 (over 5 years old), the E3000 still holds it own. You can overclock it to 532mhz, has a 2.4GHz and a 5.8GHz radio (simultaneous), it supports both DD-WRT & Tomato, and the throughput is still impressive; ~130mbps routed on Shibby v130.

As part of designing a campus wireless solution, we searched-and-searched for a cost effective way to create per room/apartment VLANs; e.g. residents and students have a wireless printer, a Roku, an Apple TV, and mobile devices that all need to talk mDNS & UPnP on a “local” network. Typical client-to-client isolation on campus wireless APs make this difficult. Currently we have older integrated DOCSIS cable modems with wireless routers providing this “local” network (e.g. Motorola SBG901)

So, after many hours with vendors and internal discussions, we made a decision: the best, simplest, easiest option is to create wireless routed bridges. Refer to this DD-WRT wiki page on “Linking Routers“; specifically “Client Bridged“. Not all residents will need this solution; only those with wired desktop(s) and those needing a “local” network for devices.

That solution leads us back to the Linksys E3000. For ~$35 on eBay, with its open-source firmware support and having two radios, it is an ideal candidate to create cost-effective, high performing, wireless routed client bridges. The 5GHz radio in client mode as the WAN connection, connected to our campus wireless dual-band APs. The 2.4GHz radio and LAN switch ports providing a local, routed private network for resident devices (e.g. 192.168.1.X).

Turning back the clock: Convert a WRT610N v2 to E3000

It just so happens that Linksys also made the WRT610N v2 with identical hardware to the E3000.  Here are the steps (loosely based on this post):

  1. Flash to DD-WRT from the Linksys web interface: get the WRT610N v2 image “dd-wrt.v24-15962_NEWD-2_K2.6_mini_wrt610nv2.bin”. I am assuming the IP address of the WRT610N v2 is 192.168.1.1.
  2. Download this complete pacakge of WinSCP portable, HxD portable hex editor, Putty portable, the latest E3000 firmware, and latest Shibby VPN (v130) firmware for the E3000. Feel free to go compare MD5 hashes before flashing or go download the apps individually: WinSCP portableHxD hex editor portable (go down on the page for the portable version), & Putty portable.
  3. Make a copy of the e3000_cfe_V21_COPY_ME_BEFORE_EDITING.bin
  4. Using HxD, open the duplicate copy of e3000_cfe_V21.bin
  5. With the .bin open, hit “Search” on the top menu bar, then “Goto”.
    1. Search for “1E00” and hit “OK”.  This will show you the MAC address location. Flip over your WRT610N v2, find the MAC address on the back, and type in the MAC address delimited by colons (:); e.g 00:00:00:00:00:00. HxD will prompt you if make a mistake (e.g. “this operation changes the file-size”); DO NOT hit OK. You do not want to change the file-size. Hit “Cancel”.
      hxd_cfe_e3000_editing
    2. Do the same for the serial number. Search for “3FE30” and fill in the serial number.
    3. And the same for the PIN; search for “3FCDC” and enter the PIN number from the back without the dash (-).
  6. Save your newly customized CFE .bin.
  7. Login to DD-WRT, go to the Services tab, and “Enable” the SSHd. Hit “Apply”.
  8. Open WinSCP, “File Protocol”, choose SCP, type in the router address, and hit connect. Browse to “/tmp” (or pick your preferred folder).
    winscp_cfe_e3000_transfer
  9. Copy over the customized CFE .bin to “/tmp”. Do not reboot.
  10. Using Putty, connect to 192.168.1.1 and login.
  11. Type the following commands and DO NOT reboot:
    cd /tmp
    mtd unlock cfe
    mtd write -f [CFE .bin's filename] cfe
  12. Go to the web interface, “Administration” at the top. Then “Factory Defaults“. Hit “Factory Defaults” and hit “Apply”. The router will reboot.
  13. After reboot, login to the web interface and go to “Administration” and then “Firmware Upgrade“.
  14. Flash the OEM factory “FW_E3000_1.0.06.002_US_20140409_code.bin” firmware contained in the .zip file.
  15. Wait. A-long-time. The router will reboot a couple of times. Then retry to login to the web interface. You will not be able to login (NVRAM still contains the encoded DD-WRT password). Get a pen or paperclip, push and hold the reset button for 30 seconds, while holding the reset button, pull the power, count to 5, and plug it back all while holding the reset button. Keep holding the reset button for another 30 seconds and finally release. The router will reboot one final time.
  16. You should now be able to login to the OEM firmware with “admin” as the username and “admin” as the password.

Flashing DD-WRT or Tomato Firmware (non-OEM)

  1. Get on OEM factory firmware. Follow the prior three steps above to get to the factory E3000 firmware from Linksys. Make sure you also clear the NVRAM and be patient while it resets.
  2. Login to the OEM firmware at 192.168.1.1; username: admin / password: admin
  3. Go the “Administration” link at the top.
  4. Then to “Firmware Upgrade”
  5. (As of 7/5/2016, my preferred firmware choice) For DD-WRT, contrary to a lot of conflicting information, you can flash directly to:
    dd-wrt.v24-30082_NEWD-2_K3.x_mega-e3000.bin

    but you must use a paperclip and clear NVRAM after waiting 5 minutes for the flash to write. NOTE: be patient and wait a full 5 minutes to be safe!

  6. For Tomato, I recommend Shibby v132 (before MultiWAN was introduced):
    tomato-E3000USB-NVRAM60K-1.28.RT-MIPSR2-132-VPN.zip
  7. After flashing either Tomato or DD-WRT, login to the web interface and clear the NVRAM (again). In Tomato, go to “Administration” then “Configuration”, and do a “Thorough” NVRAM erase. In DD-WRT, go to “Administration” then under “Factory Default”, select “Yes” and hit “Apply”.

Wireless Client Bridged: DD-WRT

  1. On “Setup” tab, set Timezone & NTP:
    Time Zone:
  2. US/Eastern

    Server:

  3. 0.north-america.pool.ntp.org

    Hit “Save”

  1. Go to the “Wireless” tab.
    Set the bottom wireless adapter (5GHz) mode to “Client”.Set Network Name to the wireless network/SSID you want to connect the bridge. For example, “BV”. In a wireless client bridge, think of this as a WAN connection replacing the hard-wired physical WAN port.Set the top wireless adapter (2.4GHz) to the local network/SSID. For example, “Resident Network”. Choose 20MHz. Pick a channel (do not leave auto).
    dd-wrt client bridge wifi setup
  2. Go to “Wireless Security” sub-tab (in the “Wireless” tab).Set both to WPA2-Personal, AES (Do not use the TKIP+AES).
    Wireless Security for 2.4GHz radio; whatever password you want for the local network.
    Wireless Security for 5GHz radio; password for the network you are connecting to as your WAN.
    Hit “Save”.
  3. Go to “Services” tab
    Under DNSMasq disable “No DNS Rebind”.  A must!
    Disable ttraff Daemon (last option – trying to limit the number of NVRAM writes over time)
    Hit “Save”.
  4. Go to “Security” tab
    Uncheck all options and disable “SPI Firewall” at the top.
    Hit “Save”.
  5. Go to “Administration” tab. Under “Management” tab.
    Under Remote Access, Web GUI Management “Enable” (choosing NOT to use HTTPS to keep it simple). Port 8080 is default.
  6. Go to “Administration” tab. Then “Keep Alive” subnet.
    Reboot at least weekly at 2am (keep the client bridge “fresh”)
    Hit “Save”.
  7. Reboot router for changes to apply (or click “Apply”; full reboot preferred).
    After reboot, login to DD-WRT (192.168.1.1) again and look upper right; it should show a WAN IP in the range of the wireless network you are bridging.

Wireless Client Bridged: Tomato

This assumes Tomato; DD-WRT can be a client AND a repeater (which means you can be a 5GHz client and be an AP for 5GHz clients). But in the interest of keeping this simple, the 5GHz radio will be the client, the 2.4GHz radio would be the AP for “local” clients. I also had issues getting “Repeater” or “Repeater Bridge” mode working on DD-WRT (newer builds have issues).

Log into the web interface and go to the “Basic” then “Network”. Refer to the screenshot below.

  1. Type: DHCP assuming the AP you are connecting to assigns IPs
  2. Under “Wireless (2.4 GHz / eth1)” this is the setup of the “local” wireless connection in a private subnet to be routed out of the 5GHz WAN/internet connection.
  3. Under “Wireless (5 GHz / eth2)” set to “Wireless Client”. Enter the exact SSID and password/key used to connect to the exiting 5GHz network. Be careful: everything is case sensitive.

e3000_tomato_client_bridge

In conclusion…

For $20-$35, you have a very fast (upwards of ~130mbps) routed wireless 2.4GHz repeater with a 5GHz uplink (client) for the WAN/internet. The irony is that it is less then similarly performing USB dual band wireless adapter and its much more versatile. Enjoy.

Technology for Families – Part 1: Guidance for Parents

9/23/2018 UPDATE: Latest PowerPoint & Handout w/ Matrix including the recommendation to use Circle with compatible NETGEAR routers.

Part 1 is a “technology parenting” overview.  Part 2 is the technical “horsepower” and resource for securing your home internet connection. Securing your router is a foundation of Part 1 and, in my professional opinion, a best practice for anyone using the internet.

I am passionate about my faith, my family, and Technology. This post combines all three. Even if you do not believe in Jesus as Christ, hopefully the concepts and technical information apply to all parents.

Backstory

Over the past five years, I consulted and built a close relationship with a high-profile, local bank executive. He shared with me the struggle of raising two teenagers and the challenge Technology has been specifically for his son. Porn, inappropriate apps, excessive video games, etc. We reviewed options, put a technical and practical plan in place, and I got to see secondhand how knowledge today’s teens’ are with technology.  His son promptly attempted, unsuccessfully, an iPhone restore and hard reset his Xbox 360.  You get the idea.

After having individually consulted over 100 families, it is clear: parents are completely over-matched for today’s Technology with their kids. Parents with good intentions need better tools and a boost in knowledge. To test my message, I presented this material and conducted a follow-up technical workshop at our church, Calvary Church, with the counseling pastor. It confirmed the need: over 80 parents and 40 routers were issued to protect families. Here is the material.

Overview PowerPoint

First and foremost, as a parent, the focus must be on their hearts, minds, and your relationship with them. The technical aspects are to provide “guardrails” and support parenting.  Please browse the PowerPoint.

technology-parenting-powerpoint-preview

Parent Technology Matrix

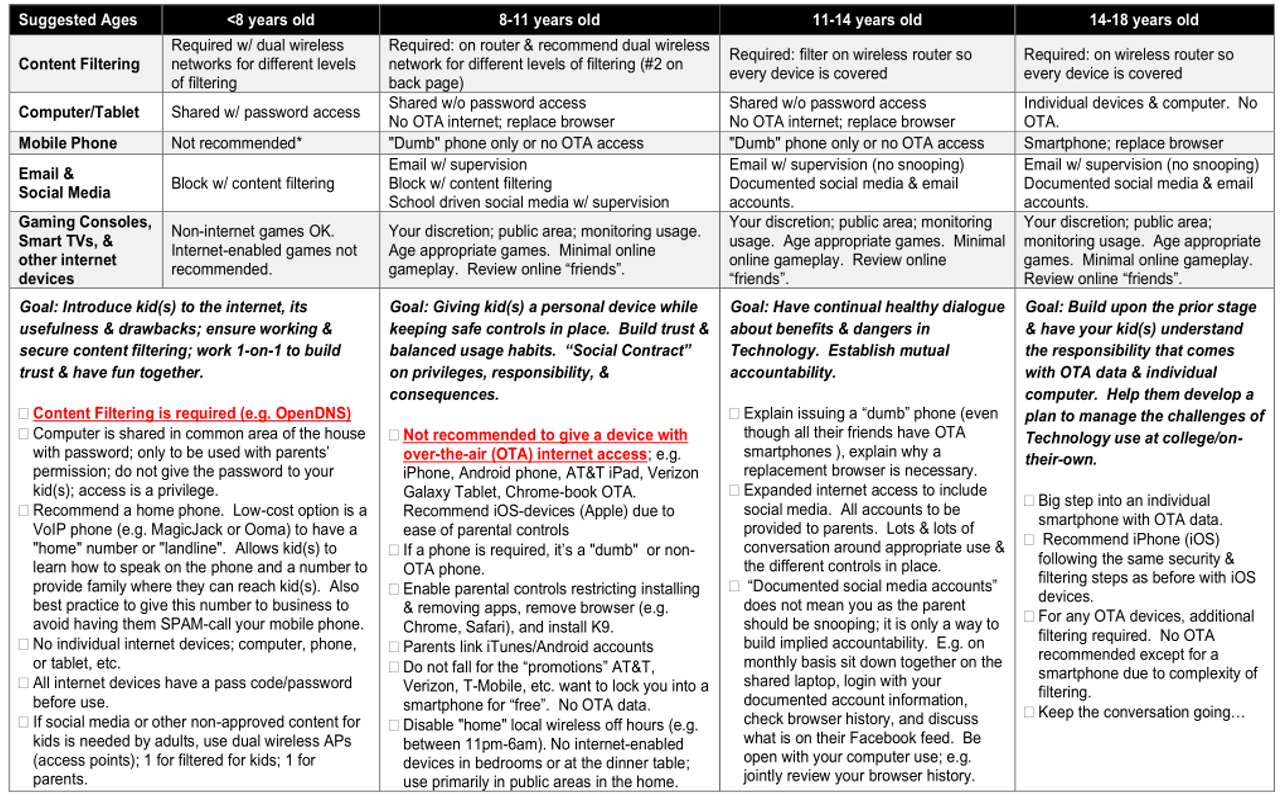
A visual to effective “technology parenting” is matrix that guides parents at each age on how to interact with technology. As mentioned, this is based on Christian values, but I believe it applies to all families looking to be proactive and deliberate on implementing technology in the home. Again, this matrix is a guide; browse the pdf.

technology-parenting-matrix

Feedback

I got a wealth of feedback; mostly positive. Some parents shared this matrix is not realistic.  They shared their second grader was using required iPads at school, etc. The irony is how the Children’s Online Privacy Protection Act is to protect kids under the age of 13 years old, yet kids under the age of 13 years old are the primary offenders. Parents also shared that having multiple kids, especially those that are spread out, create technical challenges on how to implement content filtering.  See Part 2.

Next Steps

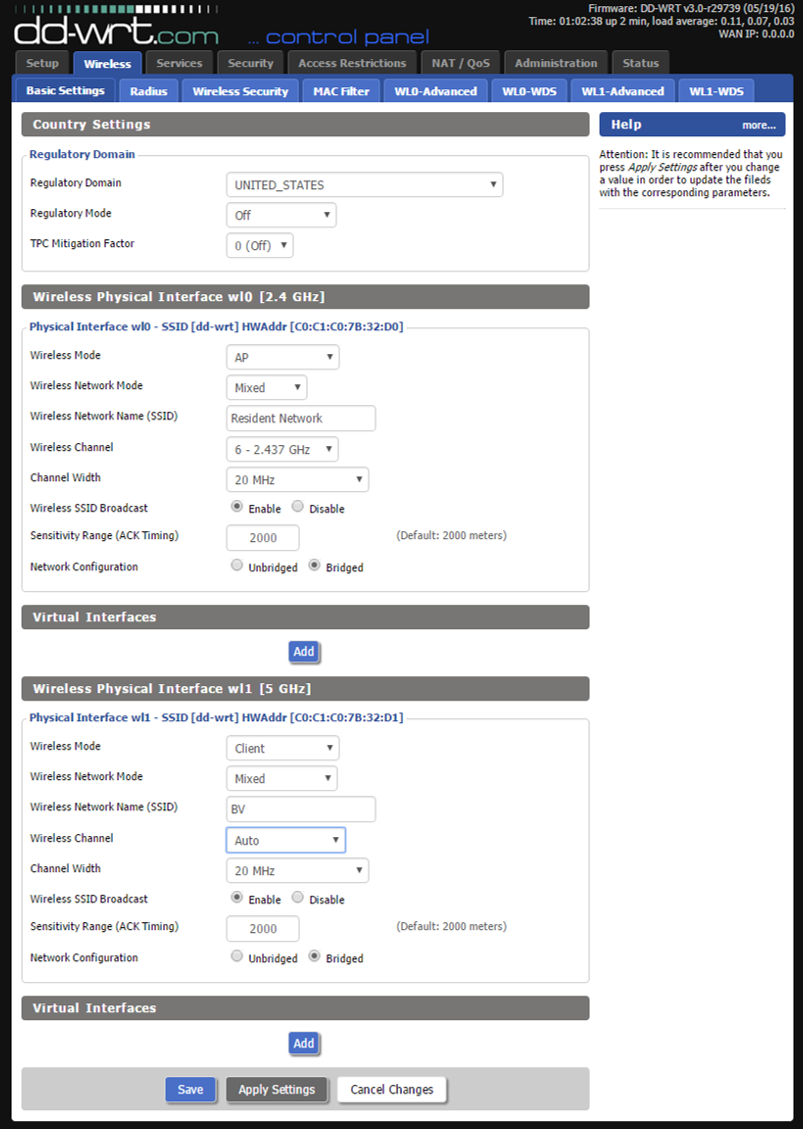
The technical-router-workshop is the next step and post. It goes into extensively detail on how to secure and insulate your home/business network from porn and malware.  Open to your feedback; comment below.


Technology for Families – Part 2: Hardcore Porn & Malware Filtering

This is Part 2.  Part 1 is a “technology parenting” overview.  Part 2 is the technical “horsepower” and resource for securing your home internet connection. Securing your router is a foundation of Part 1 and, in my professional opinion, a best practice for anyone using the internet.

Overview

By the end of this post, you will have a very cheap and powerful DD-WRT router with two SSIDs (wireless network names).  One for you and your older kids with a less-restricted or no content filtering.  Another wireless network for your kids that is secured with OpenDNS’ family content filter.

A quick technical commentary: A simple approach to this is a creating a “kids” VLAN.  The major, which is unacceptable for most homes, is that in a home/SMB network you want everything to be on the SAME VLAN.  Having separate VLAN breaks every “newer” convience such as AirPrint, DLNA, Rokus, Screen Mirroring, wireless printers, etc; basically anything that relies on SSDP and mDNS.  Said another way, if you have separate VLANs, kids on their “kids” content filtered network could not print to your wireless printer on the “parents” VLAN; and vice versa.  The solution I propose eliminates this issue by putting everyone on one VLAN, uses ebtables to “mark” packets from the “kids” SSID, and then enforces these “marked” packets to use a parallel instance of dnsmasq for DNS which relays to OpenDNS Family Filter (or whatever DNS servers of your choice).

On a semi-related topic, you could add a third SSID to create a guest VLAN: here is a DD-WRT guide for builds >23020 for simple creation of a guest VLAN.

Notes, Assumptions, & Prerequisites:

  1. Refer to the next section for a support-router
  2. You have broadband internet.
  3. You want to protect your home. You recognize that the steps below will not protect you/your family against over-the-air data. Refer to the handout in Part 1. The steps below along with your new router protect your local wireless network only.
  4. Connect the blue port on the router to port #1/WAN port on your modem.
  5. As you go through the following steps, please fill out of the “Checklist and Documentation”. This is required in order to properly troubleshoot and keep you organized in the future when making changes.
  6. When you see text in quotations (e.g. “password”), only use the text inside the quotes. Do not copy/paste the quotes. The quotes are there to make it clearer for you to read.
  7. If you have Comcast, make sure you enable bridge mode if you have Comcast phone service; follow these instructions closely.
  8. If Comcast, make sure you disable Xfinity Hotspot; follow these instructions.

Hardware Needs & Original Flashing

  1. These steps are specific to the TP-LINK TL-WR841N Wireless Router (available on Amazon for >$20).  It is a cheap, DD-WRT supported router. You want a “v9.x” version router. Be aware: TP-LINK may release newer revisions that do not support DD-WRT under the same “TL-WR841N” model number.
  2. You can flash the TP-LINK TL-WR841N v9 flashed to DD-WRT rather easily.
  3. Download a recent build (I tested on this one from April). This is for v9 ONLY.  See the bottom of the router to make it its “v9.x”.  You can flash this version directly in the TP-LINK GUI. Just login to 192.168.0.1 and browse to the firmware you just downloaded from DD-WRT.  For step-by-step instructions, see this post by Gregg Borodaty.  Remember: you have to flash the v9 firmware.
  4. I cover in another post how to revert back to the original TP-LINK OEM firmware if desired.  Or how to cross-flash to Gargoyle which has certain benefits that I am not going to cover here.
  5. If you have another DD-WRT router, the below configuration is basically the same with some minor but critical changes to the copy/paste steps.  Post a comment if you want specific help.  E.g. instead of “ath0.1” it may be “wl0.1” for Broadcom-based routers or “ath1.1” for 5GHz dual band Atheros routers (wl1.1 for Broadcom dual band 5GHz routers).

OpenDNS Setup

  1. Go to OpenDNS and signup for a free account: https://www.opendns.com/home-internet-security/parental-controls/opendns-home/. Hit the “SIGN UP NOW” orange button. At right, enter your information to setup your account. Write your username and password down on the checklist at the end; #1.
  2. Check your email for an account confirmation email from OpenDNS.  Not all email services allow hyperlinks within the content of messages, if the link in your email is not clickable copy and paste the link into your browser to confirm your account.  If you click (or copy and paste) the link in the confirmation email you will be taken to your OpenDNS dashboard.
  3. Once confirmed, move on to router setup.

DD-WRT TP-LINK TL-WR841N Router Setup

  1. Go to http://192.168.1.1/
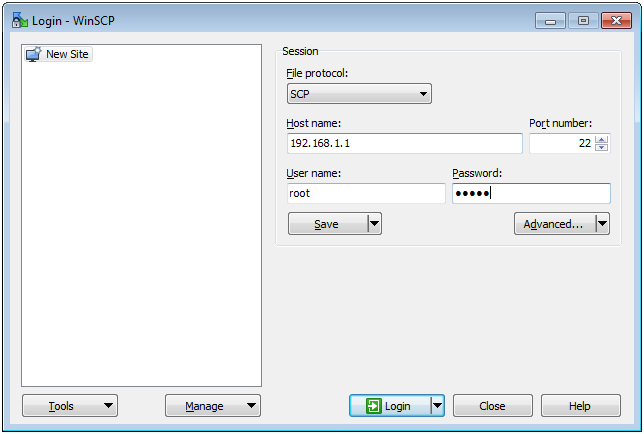
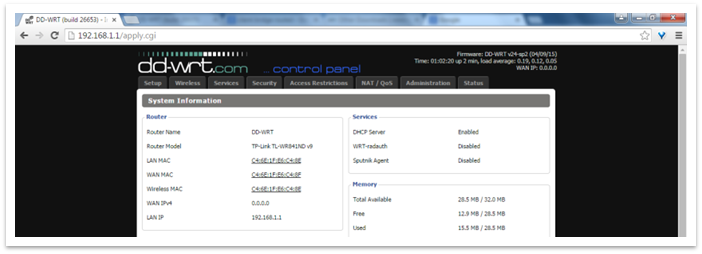
Click “Setup” at the top and enter the following when the webpage prompts you:Username: “root” / Password: “admin” (admin is the default DD-WRT password)
  2. First, change the default password. At the top, go to “Administration”. Scroll down and enter “root” as the username (overwriting the ••/***). Please enter a new password and re-confirm it; please make it something your kids cannot guess. Write your username and password down on the checklist at the end; #2. Scroll further down and check the box next to “Info Site Password Protection”. Go to the bottom and hit “Save”. This is the router password that you will need to make changes to the router in the future, and prevents your kids from changing settings.
  3. Next, click on the upper left tab “Setup”. It should take you to the “Basic Setup” sub-tab. Scroll down, feel free to name your router whatever you would like under “Router Name”. Scroll to the bottom and enter the “Time Settings” as follows:

    Copy/paste to make data entry easier: 0.us.pool.ntp.orgHit “Save”.
  4. Click on the “DDNS” sub-tab at the top (next to “Basic Setup”). Select “Custom”. Enter the following information. Copy/paste below.
    1. DDNS Service: “Custom”
    2. DYNDNS Server: “updates.dnsomatic.com”
    3. <Enter your OpenDNS username and password you setup earlier; should be #1 on your checklist>
    4. Hostname: “all.dnsomatic.com”
    5. Under URL: “/nic/update?hostname=”

    Hit “Save” at the bottom.

  5. Click on the “Wireless” tab at the top. Under “Wireless Network Name (SSID)” enter whatever you want the parents/adult/older kids network to be named. For demonstration, I am calling it “Home Wireless”. Hit Save.

    Once saved, click on “Add” under “Virtual Interfaces” and enter a network name “Wireless Network Name (SSID)” for the kids. For demonstration, I am calling it “Kids Wireless”. Hit Save.

  6. At the top, go to “Wireless Security” and under “Security Mode” select “WPA2 Personal”. Under “WPA Shared Key” enter whatever password you want for your parent wireless network. In the example, this is the “Home Wireless” network. It must be 8 characters and should not be easily guessable and not shared with kids. Hit “Save”. Write down the “Home Wireless” key on the checklist at the end; #3.

  7. Do the same for the “Virtual Interfaces ath0.1“below. Make sure you hit “Save” from the step before then add the security information for the virtual interface. Select “WPA2 Personal”, under “WPA Shared Key” enter whatever password you want for your kids wireless network. In the example, this is the “Kids Wireless” network. It must be 8 characters and given to your kids. Write down the “Kids Wireless” key on the checklist at the end; #4.
  8. Next click on the “Services” tab at the top. Scroll down to the “DNSMasq” section. Enable “Query DNS in Strict Order”and copy/paste the following carefully into the “Additional DNSMasq Options”. Hit “Save”.
  9. no-resolv
    server=199.85.126.20
    server=199.85.127.20
    address=/google.com/216.239.38.120
    address=/google.ca/216.239.38.120
    address=/www.google.com/216.239.38.120
    address=/www.google.ca/216.239.38.120
  10. Go to the bottom of the “Services” table and disable the last option: “ttraff Daemon” (this prevents excess nvram writes over time; leave it enabled if you want WAN traffic history). Hit “Save”.
  11. At the top, go to the “NAT /QoS” section. Then go to the “UPnP” submenu at top. Enable both the “UPnP Service” and “Clear port forwards at startup” options and hit save. See below.
  12. At the top, go to “Administration”. Next, click on the “Keep Alive” sub-menu at top. Hit enable for “Schedule Reboot”. Enter when you want the router to automatically reboot itself to stay healthy. E.g. below at 2:00am Sunday morning. Select the radio button to the right of “At a set time” and choose “2” under the first drop-down menu. Hit “Save”.
  13. Go to the “Commands” sub-menu.
    Copy/paste very carefully the following code into the “Commands” box.
    #KidsWireless DNS repeater instead of directly forwarding to OpenDNS to handle Google SafeSearch
    sleep 5
    dnsmasq -S 208.67.222.222 -S 208.67.220.220 -R -i br0 -p 54 --address=/google.com/216.239.38.120 --address=/google.ca/216.239.38.120 --address=/www.google.com/216.239.38.120 --address=/www.google.ca/216.239.38.120

    Hit “Save Startup” at the bottom.

  14. Next, Copy/paste very carefully the following code into the “Commands” box.
  15. #Append HomeWireless/non-marked traffic to local DNS server, NortonDNS, using the integrated DNSMASQ instance
    iptables -t nat -I PREROUTING -i br0 -p udp --dport 53 -j DNAT --to $(nvram get lan_ipaddr)
    iptables -t nat -I PREROUTING -i br0 -p tcp --dport 53 -j DNAT --to $(nvram get lan_ipaddr)
    
    #Mark packets coming out of ath0.1 (KidsWireless)
    insmod ebtables
    insmod ebtable_filter
    insmod ebt_mark.ko
    sleep 2
    ebtables -I INPUT -i ath0.1 -j mark --set-mark 2
    
    #Append traffic for KidsWireless to local DNS server, OpenDNS, running on the manual instance of DNSMASQ on port 54
    iptables -t nat -I PREROUTING -i br0 -p tcp --dport 53 -m mark --mark 2 -j DNAT --to $(nvram get lan_ipaddr):54
    iptables -t nat -I PREROUTING -i br0 -p udp --dport 53 -m mark --mark 2 -j DNAT --to $(nvram get lan_ipaddr):54
    
    #For 5GHz dual band Atheros routers with virtual SSID
    #ebtables -I INPUT -i ath1.1 -j mark --set-mark 2
    
    #For Broadcom Routers
    #ebtables -I INPUT -i wl0.1 -j mark --set-mark 2
    #For 5GHz dual band Broadcom routers with virtual SSID
    #ebtables -I INPUT -i wl1.1 -j mark --set-mark 2
    
    
    #CRON key for setting up a wireless schedule
    #minute (0-59),
    #| hour (0-23),
    #| | day of the month (1-31),
    #| | | month of the year (1-12),
    #| | | | day of the week (0-6 with 0=Sunday).
    #| | | | | commands
    #
    #For example to disable wireless between 9pm-6am (and disables it every hour the hour in between). To override/extend access another hour just reset the router.
    #0 21-23,0-5 * * * root ifconfig ath0.1 down
    #0 6 * * * root ifconfig ath0.1 up
    #
    #Now how about turning off wireless only on S,M,T,W,TH nights? (O=Sunday)
    #0 21-23 * * 0-4 root ifconfig ath0.1 down
    #0 0-5 * * 1-5 root ifconfig ath0.1 down
    #0 6 * * 1-5 root ifconfig ath0.1 up
    

    After pasting the code above, hit “Save Firewall”. It will take roughly 30 seconds for the firewall script to save.

  16. Lastly, go back to the “Management” sub-tab at the top, scroll the entire way to the bottom, and click the red “Reboot Router” button.

Linking OpenDNS to your home internet

(Do NOT do this away from home; These steps must be done directly on your broadband connection at your home)

  1. First, go re-read section #1, “Notes, Assumptions, & Prerequisites” and ensure you have your Comcast or internet connection setup correctly. Confirm you modem/internet connection is in bridge mode. Your best option is to purchase your own modem (Motorola SB6141 is recommended) that does bridging by default.
    • The key is getting a public IP address assigned directly to your router. Not only will it make filtering work correctly, it will make the internet faster and allow ports to automatically be opened for certain devices (e.g. AppleTV, Roku, Chromecast, etc.) making those devices work better.
    • To check if your router is getting a proper public IP address, login to http://192.168.1.1 and look at the upper right. You will see a “WAN Address” line in white text. If that number does NOT start with “10.x.x.x” or “172.x.x.x” or “192.x.x.x” (where “x” represents any number) you are good to go. If that line starts with a 10, 172, or 192, then your modem is also a router and not in bridge mode correctly. Please call your internet provider and have them walk you through getting the modem into bridge mode.
  2. Login to OpenDNS. www.opendns.com. At the top, click on “Dashboard”(The steps and screenshots are from https://support.opendns.com/entries/53936430-Configuring-OpenDNS-on-your-Network with edits for working with DD-WRT.)
  3. Next you need to “Add a Network”. You will see a big box on your Home screen that says Add a network as shown below. Adding a network to your OpenDNS dashboard allows you to use our custom content filtering and stats features. Click on the Add a network box to get started:Once you click Add a network you will get the below screen which asks you to add an IP address.  If you are on your home network you will see your current IP address displayed at the top of your dashboard where it says Your current IP is.  Copy this number from the top of the screen. This is your current external (public) IP address that is assigned to you by your internet service provider as your network.   Use that IP address for your dashboard network:
  4. Next you will get a screen that asks you for a network name and whether or not you have a Dynamic IP address.  If you are unsure, you most likely have a dynamic IP address.  Most internet service providers lease dynamic IP addresses which means that your IP address can change. Check off “Yes, it is dynamic”.
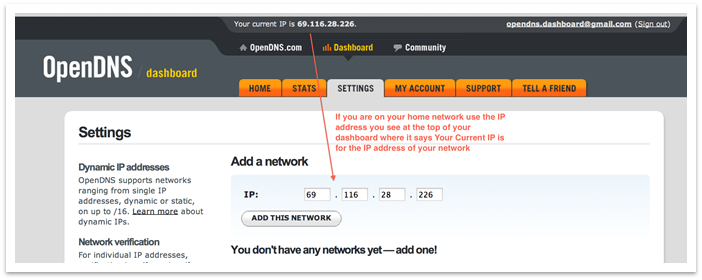
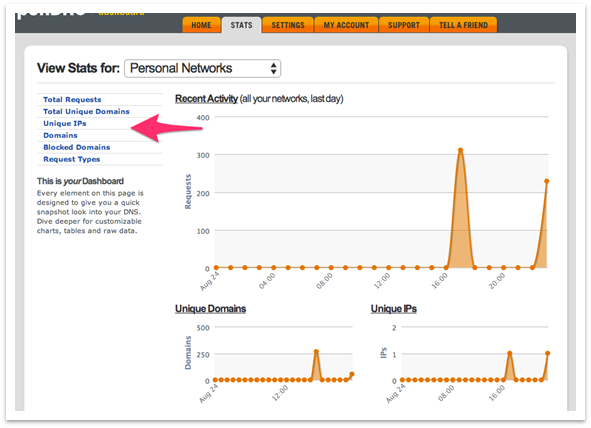
Do not download the software under #3. The DD-WRT software on the router will handle the auto updating for you if you followed the router setup instructions above under “DDNS”. If you have more questions regarding dynamic IP addresses please see Dynamic IP Addresses : Technical Detail and FAQ.
  5. After you add your network you will see the screen below. Time to check your email to verify your IP address.
  6. You should receive an email that looks like the one below, once you click the link your IP address will be verified and you will be taken back to the dashboard.
  7. Configuring Content Filtering Settings: After you have added a network, content filtering can be configured in the Settings tab.  Click on the Settings tab and choose the network you added from the Settings for: drop down to open the Web Content Filtering menu for this network.  In the Choose your filtering level settings you can choose from one of the levels that are pre-set or chose Custom to select the categories you would like to filter on your network. Custom is powerful and recommended to filter specific categories like Social Media, File Sharing, and Webmail.
  8. Based on our PG-13 presentation, especially for younger kids, please enable the following categories: Adult Themes, Alcohol, Dating, Lingerie/Bikini, P2P/File Sharing, Pornography, Adware, Chat, Drugs, Hate/Discrimination, Gambling, File Storage, Classifieds, Nudity, Phishing, Proxy/Anonymizer, Social Networking, Tasteless, and Webmail (to block web-based email). This is the “magic” of the router. These categories will only apply to those connected to the “Kids Wireless” connection. “Home Wireless” is filtered via Norton ConnectSafe for general pornography and adware.
  9. You can also manage individual domains to customize your filtering settings.  For example, if you choose to block the Lingerie/Bikini category but would still like to shop at victoriassecret.com you can add victoriassecret.com to your Never Block list which will allow access to victoriassecret.com while blocking all other domains in that category.For more information on content filtering please see: Web Content Filtering and Security.For more information on configuring the Manage individual domains section please see: Getting Started: Blocking/Allowing Specific Domains with Whitelist/Blacklist.
  10. Configuring Reporting/Statistics: If you would like statistics for your network, first you must Enable stats and logs on your network. To do so, click on the Settings tab, choose the network you added from the Settings for: drop down and click on Stats and Logs from the left hand menu. You will see the option to enable stats and logs, check the box and hit APPLY to enable stats as shown below:

    It can take up to 24 hours for stats to initially populate after you enable them, so if you don’t see them right away don’t fret they are coming! When stats begin to populate you can view them in the Stats tab. There are several different ways you can view your stats by choosing the options in the left hand menu:

Testing, FAQs, and more technical information

  1. Almost done. Well done. Now time to test. The “Home Wireless” network uses Norton ConnectSafe. To test your “Home Wireless” network go to playboy.com. IT SHOULD BE BLOCKED. As of 4/15/2015 (and since 2010) the playboy.com homepage is “safe” and does not have pornographic images on the homepage. Assuming you followed the steps above correctly, you should NOT get the playboy.com site and instead get the Norton ConnectSafe block page.
  2. Thankfully OpenDNS has an easy testing website. To test OpenDNS, connect to the “Kids Wireless” connection and go to www.opendns.com/welcome. You should get a large checkmark indicating OpenDNS is setup correctly. If you do NOT get a large checkmark, you have something incorrect in the “Commands” section above (or see NOTE2 below) where you copied/pasted the large block of gray-colored code. Retry and reboot router and PC and retest on “Kids Wireless”.NOTE: OpenDNS will “work” with a green checkmark but that does NOT mean your low/medium/high/custom OpenDNS filtering settings are being applied. You must try a website that you know should be blocked in a category you specified and look for the OpenDNS block page instead of the website loading. For example, if you select “Custom” filtering profile and you then check off to block “Social Media”, this should block Facebook.com. When you go to facebook.com when using the “Kids Wireless” connection it should NOT load facebook.com and instead give you the OpenDNS block page.If for example, you expected Facebook to be blocked based on your OpenDNS categories, and it is not AND you correctly get the checkmark indicator when you go to www.opendns.com/welcome, then your issue is with the “DDNS” section above. Your router is not correctly telling OpenDNS what your home internet connection IP address is and thus not applying your custom filtering categories. This could also be an issue if you did not properly put your modem into bridge mode.
    NOTE2: The commands above in the “Commands” step that start with “iptables” handle the DNS enforcement. If your kids try to specify their own DNS settings to bypass the filter, the router redirects everything back to its local DNS server (called DNSMasq) which then forwards everything to either OpenDNS (for kids) and Norton ConnectSafe (for parents/Home Wireless).

KEEP THIS PAGE
Checklist and Documentation

  1. OpenDNS.comUsername: ________________________Password: _________________________
  2. Router Configuration: http://192.168.1.1Router Username (root): _________________________Password: __________________________
  3. Parent/Home Wireless (≥8 characters): __________________________
  4. Kids Wireless Password (≥8 characters): __________________________

Last Thoughts: Support & Sharing with Others

I will do my best to assist families. As mentioned in Part 1, I share a passion for Christ and helping parents navigate technology to strengthen families and faith. I, with the help of the pastors, have spent >30 hours putting together this material: the presentation, handout, this router workshop material and equipment. I am trying, in good faith, to have this material stand on its own. That being said, I also know there will be many questions and many unique situations that we cannot document or anticipate. I do anticipate issues; with your internet provider, with a device, with setup questions. I will do my best to respond to comments and questions.  Cheers.

For historical reasons, here is the original Word docx (and pdf).  Refer to the post for current and updated information.


“Set Up Internet Explorer 11” Bypass with GPO or Registry

This took too long to Google the answer.  Most information is out-of-date with IE8/IE9 solutions.  It is basically a duplicate of this post from Andres Cheah.

The goal is to bypass this dialogue box:
set-up-ie-11

Our users are easily confused.

Using Group Policy Editor

  1. Use gpedit.msc or launch the Group Policy Editor.
    Note: In an Active Directory environment, open gpmc.msc and either edit an existing GPO, or create a new one and link it to the domain level, or to an OU of your choice.
    Refer to “Group Policy for Beginners” from Microsoft for the basics.
  2. In the left pane, expand User Configuration > Administrative Templates > Windows Components > Internet Explorer.
  3. On the right pane, double-click on “Prevent running First Run wizard”. A new settings window will open up.
    prevent-first-run-ie-11
  4. Set the value to “Enable”.
  5. In the options section you must choose one of the two options from the drop-down menu:
    1. Go directly to “Welcome To IE” page.  This configures IE to skip the Welcome screen and and go to the “Welcome to Internet Explorer” page directly.
    2. Go directly to home page.  This configures IE to skip the Welcome screen and go directly to your home page.  This is the option we chose.  You can combo this up with this post from ServerFault to also push a desired homepage to users.
      You need to choose one of the two, otherwise the configuration will not work.

For those who really want to dig into how IE11 is handling the policy, I later came across this post from chentiangemalc where it details how the policy is applied and the associated ADMX.  It also explains why much of the internet is outdated in the older “Prevent performance of First Run Customize Settings” that were used in IE8 and IE9 (e.g. here, here and here).

Publishing a legacy, 32-bit RemoteApp on Windows Server 2012 R2

In a separate upcoming post I will document our trials and security tribulations with Horizon Software and their Village Merchant Point of Sale system (i.e. cash registers with additional functionality).  Village Merchant is a SQL-based, 32-bit and, by the looks of the UI, a legacy Visual Basic app.

The two problems that I had to solve were:

  1. Installing legacy software on a shared-user Terminal/Remote App server.
  2. Running a RemoteApp executable from a remote (non-local) file share.

Solving Problem #1

To install, we had to go-back-in-time to something I had tried years ago and had forgotten.
“Use the CHANGE USER Command to Switch to Install Mode in Windows 2000 Terminal Services”.  Ironically, this commands lives on today.  Screenshots courtesy of this Microsoft blog page.

Switch Terminal Services to Install Mode

  1. Launch an elevated command prompt
  2. At the command prompt, type
    change user /install
  3. Press ENTER. The following message appears:
    User session is ready to install applications.
  4. Type exit, and then press ENTER.
  5. You are now in Change User Mode so go install programs or change settings that you want to propagate to all users.  Add or remove the programs that you want.

change user install terminal server

Switch Terminal Services to Execute Mode

  1. Again, launch an elevated command prompt
  2. At the command prompt, type
    change user /execute
  3. Press ENTER. The following message appears:
    User session is ready to execute applications.
  4. Type exit, and then press ENTER.
  5. You are now in Change User Mode so go install programs or change settings that you want to propagate to all users.  Add or remove the programs that you want.

That solved problem #1.  All users could manually launch the application.  And by “manually” I mean you had to launch the “MERCHANT.EXE” from the remote file share on the Horizon server from the full desktop UI.

Solving Problem #2

Again, the “MERCHANT.EXE” executable resides on another server and is accessed via SMB file share using the full UNC path.  E.g. \\<FQDN server name>\<shared name>\merchant.exe.

The problem is that in Windows Server 2012 R2, remote or non-local applications cannot be published by RemoteApps.  This challenge led me to this post at SpiceWorks on using a locally saved batch file to launch the remote executable.  Brilliant.

I created a local batch file (e.g. C:\<folder>\remoteapp.bat) all users could access and it contained one simple line:

@echo off
echo.
echo.
echo Launch Horizoning, please wait up to 10 seconds. . . .
echo.
echo.
PING -n 7 127.0.0.1 >nul
start "" "\\<FQDN server name>\<shared name>\merchant.exe" /MAX

The start command dates back to the OS/2 and 16-bit Windows days.  It launches an application from a command prompt; simple enough.  See here if you if you want to get fancy on window sizing, processor priority, etc.  The “ping” command resolved issues where Horizon would launch but not accept keyboard/mouse input.

When adding the remoteapp.bat batch file on the RemoteApp server, I also used the full UNC path; e.g. \\<RemoteApp server FQDN>\<folder>\remoteapp.bat (even though its a local batch file, if you ever add additional RemoteApp servers for your Collection, they will know where to locate the batch file).  Enjoy launching remote applications using RemoteApp.