A simple post confirming that the same registry key works in Windows 10.
Based largely off of this ITworld write-up by Paul McFedries.
As is commonly known, a “$” in a Windows share name makes it “hidden”. This does not mean it is any more secure; it only obscures the name. That said, Microsoft, by default, enables hidden shares for “Administrative” purposes, including one for the system drive, C: (C$), and any other hard disk partitions you have on your system. Windows Vista+ also sets up the following hidden shares:
| Share | Shared Path | Purpose |
|---|---|---|
| ADMIN$ | %SystemRoot% | Remote administration |
| IPC$ | N/A | Remote interprocess communication |
| print$ | %SystemRoot%\System32\spool\drivers | Access to printer drivers |
Open an elevated Command Prompt and type “net share” and press Enter. You see a listing similar to this:
Share name   Resource                        Remark
-----------------------------------------------------------
C$           C:\                             Default share
D$           D:\                             Default share
ADMIN$       C:\WINDOWS                      Remote Admin
IPC$                                         Remote IPC
print$       C:\System32\spool\drivers       Printer Drivers
Public       C:\Users\Public
So although the C$, D$, and ADMIN$ shares are otherwise hidden, they’re well known, and they represent a small security risk should an intruder get access to your network. To close this hole, you can force Windows Vista to disable these shares. Here are the steps to follow:
- Click Start, type “regedit” in the Search box, and then click regedit.exe in the search results. The User Account Control dialog box appears.
- Say “Yes” to the UAC prompt and the Registry Editor should open.
CAUTION – BE CAREFUL WITH YOUR REGISTRY – ONLY CHANGE
- Open the HKEY_LOCAL_MACHINE branch.
- Open the SYSTEM branch.
- Open the CurrentControlSet branch.
- Open the Services branch.
- Open the LanmanServer branch.
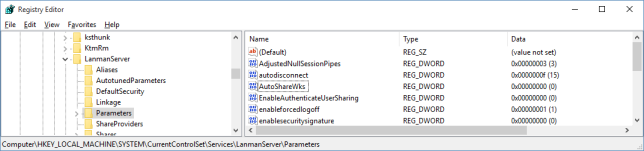
- Select the Parameters branch.
- Select Edit, New, “DWORD (32-bit) Value”
- Type “AutoShareWks” and press Enter. (Leave the default value of 0.)
- Reboot or restart the “server” service using a Command Prompt: “net stop server” then “net start server”.

Once again, open an elevated Command Prompt and type “net share” and press Enter. The output should now looks like this:
Share name   Resource                        Remark
-----------------------------------------------------------
IPC$                                         Remote IPC
print$       C:\System32\spool\drivers       Printer Drivers
Public       C:\Users\Public
FYI – Its possible certain applications require the hidden shares. To disable or rollback to “default” simply remove the “AutoShareWks” Registry Key or change the value to “1”.