My Linksys E3000 dual radio wireless router was finally retired last week for a Netgear Nighthawk R7000. In the early days I ran DD-WRT exclusively, but in the last two years I have split between Tomato (Shibby) and DD-WRT depending on application (i.e. Tomato as router, DD-WRT for wireless briges, repeaters).
 (Table courtesy of Wiki Devi).
For a router released in early 2010 (over 5 years old), the E3000 still holds it own. You can overclock it to 532mhz, has a 2.4GHz and a 5.8GHz radio (simultaneous), it supports both DD-WRT & Tomato, and the throughput is still impressive; ~130mbps routed on Shibby v130.
As part of designing a campus wireless solution, we searched-and-searched for a cost effective way to create per room/apartment VLANs; e.g. residents and students have a wireless printer, a Roku, an Apple TV, and mobile devices that all need to talk mDNS & UPnP on a “local” network. Typical client-to-client isolation on campus wireless APs make this difficult. Currently we have older integrated DOCSIS cable modems with wireless routers providing this “local” network (e.g. Motorola SBG901)
So, after many hours with vendors and internal discussions, we made a decision: the best, simplest, easiest option is to create wireless routed bridges. Refer to this DD-WRT wiki page on “Linking Routers“; specifically “Client Bridged“. Not all residents will need this solution; only those with wired desktop(s) and those needing a “local” network for devices.
That solution leads us back to the Linksys E3000. For ~$35 on eBay, with its open-source firmware support and having two radios, it is an ideal candidate to create cost-effective, high performing, wireless routed client bridges. The 5GHz radio in client mode as the WAN connection, connected to our campus wireless dual-band APs. The 2.4GHz radio and LAN switch ports providing a local, routed private network for resident devices (e.g. 192.168.1.X).
Turning back the clock: Convert a WRT610N v2 to E3000
It just so happens that Linksys also made the WRT610N v2 with identical hardware to the E3000. Here are the steps (loosely based on this post):
- Flash to DD-WRT from the Linksys web interface: get the WRT610N v2 image “dd-wrt.v24-15962_NEWD-2_K2.6_mini_wrt610nv2.bin”. I am assuming the IP address of the WRT610N v2 is 192.168.1.1.
- Download this complete pacakge of WinSCP portable, HxD portable hex editor, Putty portable, the latest E3000 firmware, and latest Shibby VPN (v130) firmware for the E3000. Feel free to go compare MD5 hashes before flashing or go download the apps individually: WinSCP portable, HxD hex editor portable (go down on the page for the portable version), & Putty portable.
- Make a copy of the e3000_cfe_V21_COPY_ME_BEFORE_EDITING.bin
- Using HxD, open the duplicate copy of e3000_cfe_V21.bin
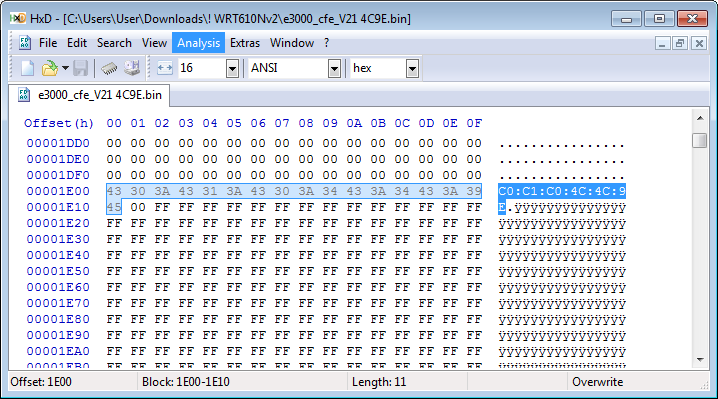
- With the .bin open, hit “Search” on the top menu bar, then “Goto”.
- Search for “1E00” and hit “OK”. This will show you the MAC address location. Flip over your WRT610N v2, find the MAC address on the back, and type in the MAC address delimited by colons (:); e.g 00:00:00:00:00:00. HxD will prompt you if make a mistake (e.g. “this operation changes the file-size”); DO NOT hit OK. You do not want to change the file-size. Hit “Cancel”.

- Do the same for the serial number. Search for “3FE30” and fill in the serial number.
- And the same for the PIN; search for “3FCDC” and enter the PIN number from the back without the dash (-).
- Search for “1E00” and hit “OK”. This will show you the MAC address location. Flip over your WRT610N v2, find the MAC address on the back, and type in the MAC address delimited by colons (:); e.g 00:00:00:00:00:00. HxD will prompt you if make a mistake (e.g. “this operation changes the file-size”); DO NOT hit OK. You do not want to change the file-size. Hit “Cancel”.
- Save your newly customized CFE .bin.
- Login to DD-WRT, go to the Services tab, and “Enable” the SSHd. Hit “Apply”.
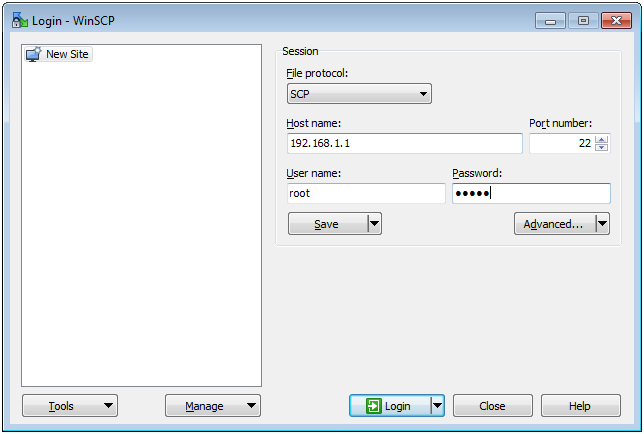
- Open WinSCP, “File Protocol”, choose SCP, type in the router address, and hit connect. Browse to “/tmp” (or pick your preferred folder).

- Copy over the customized CFE .bin to “/tmp”. Do not reboot.
- Using Putty, connect to 192.168.1.1 and login.
- Type the following commands and DO NOT reboot:
cd /tmp
mtd unlock cfe
mtd write -f [CFE .bin's filename] cfe
- Go to the web interface, “Administration” at the top. Then “Factory Defaults“. Hit “Factory Defaults” and hit “Apply”. The router will reboot.
- After reboot, login to the web interface and go to “Administration” and then “Firmware Upgrade“.
- Flash the OEM factory “FW_E3000_1.0.06.002_US_20140409_code.bin” firmware contained in the .zip file.
- Wait. A-long-time. The router will reboot a couple of times. Then retry to login to the web interface. You will not be able to login (NVRAM still contains the encoded DD-WRT password). Get a pen or paperclip, push and hold the reset button for 30 seconds, while holding the reset button, pull the power, count to 5, and plug it back all while holding the reset button. Keep holding the reset button for another 30 seconds and finally release. The router will reboot one final time.
- You should now be able to login to the OEM firmware with “admin” as the username and “admin” as the password.
Flashing DD-WRT or Tomato Firmware (non-OEM)
- Get on OEM factory firmware. Follow the prior three steps above to get to the factory E3000 firmware from Linksys. Make sure you also clear the NVRAM and be patient while it resets.
- Login to the OEM firmware at 192.168.1.1; username: admin / password: admin
- Go the “Administration” link at the top.
- Then to “Firmware Upgrade”
- (As of 7/5/2016, my preferred firmware choice) For DD-WRT, contrary to a lot of conflicting information, you can flash directly to:
dd-wrt.v24-30082_NEWD-2_K3.x_mega-e3000.bin
but you must use a paperclip and clear NVRAM after waiting 5 minutes for the flash to write. NOTE: be patient and wait a full 5 minutes to be safe!
- For Tomato, I recommend Shibby v132 (before MultiWAN was introduced):
tomato-E3000USB-NVRAM60K-1.28.RT-MIPSR2-132-VPN.zip
- After flashing either Tomato or DD-WRT, login to the web interface and clear the NVRAM (again). In Tomato, go to “Administration” then “Configuration”, and do a “Thorough” NVRAM erase. In DD-WRT, go to “Administration” then under “Factory Default”, select “Yes” and hit “Apply”.
Wireless Client Bridged: DD-WRT
- On “Setup” tab, set Timezone & NTP:
Time Zone: -
US/Eastern
Server:
-
0.north-america.pool.ntp.org
Hit “Save”
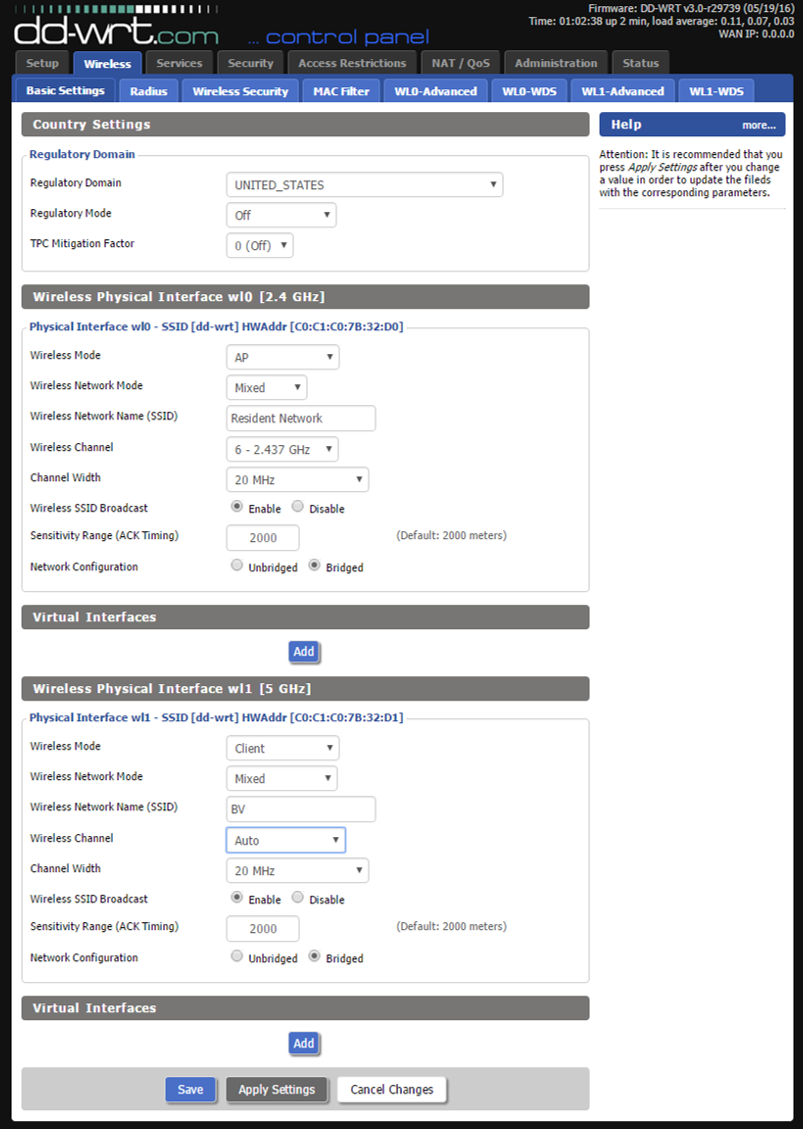
- Go to the “Wireless” tab.
Set the bottom wireless adapter (5GHz) mode to “Client”.Set Network Name to the wireless network/SSID you want to connect the bridge. For example, “BV”. In a wireless client bridge, think of this as a WAN connection replacing the hard-wired physical WAN port.Set the top wireless adapter (2.4GHz) to the local network/SSID. For example, “Resident Network”. Choose 20MHz. Pick a channel (do not leave auto).

- Go to “Wireless Security” sub-tab (in the “Wireless” tab).Set both to WPA2-Personal, AES (Do not use the TKIP+AES).
Wireless Security for 2.4GHz radio; whatever password you want for the local network.
Wireless Security for 5GHz radio; password for the network you are connecting to as your WAN.
Hit “Save”. - Go to “Services” tab
Under DNSMasq disable “No DNS Rebind”. A must!
Disable ttraff Daemon (last option – trying to limit the number of NVRAM writes over time)
Hit “Save”. - Go to “Security” tab
Uncheck all options and disable “SPI Firewall” at the top.
Hit “Save”. - Go to “Administration” tab. Under “Management” tab.
Under Remote Access, Web GUI Management “Enable” (choosing NOT to use HTTPS to keep it simple). Port 8080 is default. - Go to “Administration” tab. Then “Keep Alive” subnet.
Reboot at least weekly at 2am (keep the client bridge “fresh”)
Hit “Save”. - Reboot router for changes to apply (or click “Apply”; full reboot preferred).
After reboot, login to DD-WRT (192.168.1.1) again and look upper right; it should show a WAN IP in the range of the wireless network you are bridging.
Wireless Client Bridged: Tomato
This assumes Tomato; DD-WRT can be a client AND a repeater (which means you can be a 5GHz client and be an AP for 5GHz clients). But in the interest of keeping this simple, the 5GHz radio will be the client, the 2.4GHz radio would be the AP for “local” clients. I also had issues getting “Repeater” or “Repeater Bridge” mode working on DD-WRT (newer builds have issues).
Log into the web interface and go to the “Basic” then “Network”. Refer to the screenshot below.
- Type: DHCP assuming the AP you are connecting to assigns IPs
- Under “Wireless (2.4 GHz / eth1)” this is the setup of the “local” wireless connection in a private subnet to be routed out of the 5GHz WAN/internet connection.
- Under “Wireless (5 GHz / eth2)” set to “Wireless Client”. Enter the exact SSID and password/key used to connect to the exiting 5GHz network. Be careful: everything is case sensitive.

In conclusion…
For $20-$35, you have a very fast (upwards of ~130mbps) routed wireless 2.4GHz repeater with a 5GHz uplink (client) for the WAN/internet. The irony is that it is less then similarly performing USB dual band wireless adapter and its much more versatile. Enjoy.