Dell E6410 Refurb & Odd Hard Drive “Power On Hours”

At my prior employer we had thousands of Dell D630 (my favorite) and E6410 notebooks or, as I like to still call them, laptops.  A side thought: a quick search turned up this post on why the term “laptop” has been phased out and an ironic example of Apple’s marketing from back in 2006 (Apple: “don’t put our laptops on your lap”) when “laptops” were transitioning to “notebooks” or “portable computers”.

The Dell D630 and E6410 laptops were bulletproof.  After the E6410, HP ProBooks were issued and, in my narrow sample size, did not live up to the same ruggedness.  Fast forward to my current leadership role where we have chosen to purchase E6410 refurbished laptops from Newegg.  Before jumping to conclusions, recognize our requirements: rugged, TPM equipped for Bitlocker, reliable, readily available parts, reasonable docking stations, and decent battery life.  Notice I did not mention “super-fast-ultra-high-performance”.  Most users, consistent with our users, have performance as a secondary requirement.  With over 100 refurbished E6410 laptops deployed, I can say confidently we were stewards of our financial resources easily saving ~$30,000 in new, current generation Latitude/ProBooks.  For those users needing more performance, we simply doubled the RAM to 8GB and swapped in an SSD.  The first generation i5 are fast enough.

Back to the original point of this post: artificial power-on time.  After having success with the E6410 refurbs, I purchased one for family.  After installing a clean copy of Windows 7, I quickly checked the hard drive S.M.A.R.T data.  This is what I found:

e6410 refurb power on hours

295,016 hours!
Or roughly 12292 days; almost 34 years.

My immediate thought was maybe the company that does the refurbishment somehow alters the S.M.A.R.T. data.  Well, a little digging, and I turn up this excellent FAQ courtesy of the open source project Smartmontools.

It turns out the S.M.A.R.T. data is rather vendor specific.  Instead of working with the command line and Smartmontools, I downloaded GSmartControl, a UI front-end for Smartmontools, and I got this updated screenshot:

e6410 refurb power on hours minutes

19836 hours + 43 minutes (Hex 1227bb converts to 118981 minutes divided by 60).  This is a much more plausible number.  Not sure where Crystal Disk got its number.

~2.26 years.  I was surprised at the few “Power Cycle Count” at  309 times.  The average power up had the drive powered for ~64 hours (19836/309).  I was also interested in the high “Load / Unload Cycle” number: 504,004 is high, very high.

The S.M.A.R.T. Wikipedia page sheds light on this metric:

Count of load/unload cycles into head landing zone position.[28]  
Western Digital rates their VelociRaptor drives for 600,000 load/unload cycles,[29] and WD Green drives for 300,000 cycles;[30] the latter ones are designed to unload heads often to conserve power. On the other hand, the WD3000GLFS (a desktop drive) is specified for only 50,000 load/unload cycles.[31]

In other words, if 504,004 is the real “Load / Unload Cycle” number, this hard drive has seen its share of wear-and-tear.

For now, the hard seems to be working fine.  One last thing: check out the Smartmontools for Windows Package by Ozy de Jong. It can easily install Smartmontools as a Windows Service and has out-of-the-box email and local warning messages in the event S.M.A.R.T. data detects a problem or failure.  In this case, this E6410 is not important enough to warrant self-monitoring via email but for anything critical or any remote systems (e.g. a BlueIris video security recorder that is very hard drive intensive at a remote location).


easy2boot & WSUS Offline; a must-have USB stick for Technology professionals

I was in a difficult position.  I had an older family member drive a decent distance to get their PC fixed on-the-spot.  Long story short, they use their PC to upload insulin results and without these uploads, they have mandatory visits to the endocrinologist.

After determining the motherboard was the culprit (swapping RAM, PSU, CPU) I swapped their hard drive to another system.  Yes, I know a clean install would have been the preferred method.  However this is the “real world” and I decided to swap the hard drive rather than struggling to get Java 1.6  working (required for the insulin pump uploads; yes, I know its terrible; thank healthcare vendors), some audio recording software, and a user who needs the same icons, workflows, printer, and Quattro Pro.

Enough introduction.  The old system was a Dell Dimension 3100 Windows 7 x86 PC running in AHCI mode.  I anticipated boot issues related to different storage controller(s) after the swap.  Typically when I am planning to move from one motherboard to another, I will run “sysprep /generalize” before moving.  This “preps” Windows for the move and usually gracefully handles new hardware/HAL/storage controller(s).

In this example, I could not boot the original system, so this brings me back to the title of this post: easy2boot.  In short, easy2boot is by-far the best USB drive creation tool/utility out there.  I needed to run the HDC_fix which attempts to detect the new storage controllers and injects the appropriate drives to an offline system.  The HDC_Fix is found on many Windows PE boot .ISOs; e.g. UBCD4Win, Hiren.  In this case I used UBCD4Win.  My typical bootable USB sticks were not working (the new Acer motherboard seemed to have major issues booting USB devices) and my older boot CDs either were too old or the optical drive was unable to read the burned media.

In frustration, here were the steps that saved the day:

Step 1: Read the easy2boot “Introduction” page.

Step 2: Go to the Download page and get the “Download E2B+DPMS” version (v1.69 at the time of posting).  Extract the .zip.  I inserted a blank 32GB USB drive.  Run the “Make_E2B_USB_Drive.cmd” script to make the 32GB drive bootable with easy2boot.  I choose to format the drive as NTFS so it can handle files >4GB without any major drawbacks.

Step 3: Download the UBCD4Win ISO.

Step 4: Copy the UBCD4Win .ISO file to \_ISO\MAINMENU\ on the newly formatted, bootable 32GB USB drive.  E.g. E:\_ISO\MAINMENU\.

Step 5: Enjoy.  The new Acer system booted easy2boot without issue and the easy2boot menu auto-populated the UBCD4Win .ISO.  I ran the HDC_fix on the D:\ drive (the actual physical disk). When booting Windows off a USB drive, the C:\ is typically the “RAM Disk” or virtual drive not the actual physical disk/hard drive.  It will typically be mounted to another drive letter; e.g. D:\ or E:\.  It should be obvious because it will be the correct size and and hopefully an informative partition label.  Upon reboot, Windows 7 was happily booting.  A few minutes later with new drivers and my relatives were on their way.

Now, the post could end here, but this is where easy2boot really shines.  It can boot Windows installer .ISOs.  It can even boot UEFI Windows installers; e.g. Windows 8.1 and Server 2012 R2.

So I went to town and copied Windows 7 SP1 x86, x64 and Windows 8.1 x64, and Server 2012 R2 x64, and Windows XP SP3 (for nostalgia) to their respected folders; i.e. \_ISO\WINDOWS\XXX.  I also went back to the easy2boot Download page and got the “MPI Tool Pack (MakePartImage)“.  (“MPI Tool Pack + Clover Lite v0.048 2015-04-16″ at the time of posting).  After extracting the .zip, I ran \ImDisk\imdiskinst.exe to install the virtual disk driver.  Then I easily drag-n-dropped the Windows 8.1 .ISO onto the “MakePartImage_AutoRun_FAT32.cmd” batch file and used all the defaults to generate a .imgPTN for Windows 8.1.  I placed this new .imgPTN in the \_ISO\MAINMENU\ (not the \_ISO\WINDOWS\XXX folders) and I was able to UEFI boot to install Windows 8.1.  Very impressive.

Kudos to rmprep (SteveSi) for developing easy2boot.  You earned my donation to support your project.

Lastly, to make my 32GB USB drive even more useful (and since it is NTFS I can put anything else I want on it), I added WSUS Offline.

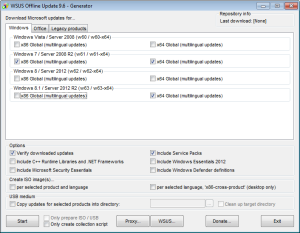
WSUS Offline is another wonderful project that I have been using and supporting for years.  Download WSUS Offline (v9.6 at the time of posting) , extract it to your USB drive, and run the “\wsusoffline\UpdateGenerator.exe”.  Pick what versions of Windows you updates for, in my case “w61”, “w61-x64” and “w63-x64” (none of my Windows 8.1/2012 R2 installs are x86), and hit “Start”.
wsusoffline96

Wait for the updates to download.  Depending on your connection speed, it will take some time.  Once complete, you now have a USB drive where you can install Windows 7/8.1/2012R2/X and run Windows Updates all from one USB drive.  To run the WSUS Offline updates, go to “\wsusoffline\client\UpdateInstaller.exe” and hit “Start”.  I usually set it to “Automatic reboot and recall”.  It automatically brings a system current on Windows Updates.

Lastly I added a few other root directories on the 32GB USB drive for DRIVERS and UTILITIES.

So to recap, I have a 32GB USB stick that 1) can install different flavors of Windows in BIOS or UEFI modes, 2) can easily and efficiently patch the new Windows install using WSUS Offline, and 3) contains drives and utilities to get the system online and setup.  Enjoy.


Remove & disable the “Get Windows 10” icon shown in the notification area (tray)

10/27 UPDATE: Microsoft continues to push Windows 7/8.x updates nagging and deceptively trying to upgrade them to Windows 10. A good overview here from ZDNet.

The best solution is  now a utility called GWX Control Panel which combines the registry changes, Windows 10 hidden install files, and the ability to restore the update all into one simple-to-use program. Download here directly from the developer; confirm MD5/SHA-1 checksums to verify. See here, thanks to Raymond, for why and how to use MD5/SHA-1 checksums.

8/1 UPDATE: Now that Windows 10 is out, the best method is to disable ‘Get Windows 10’ using a registry update.

You must be logged in as an administrator to be able to do this option.

This option will show you how to enable or disable to show the Get Windows 10 icon on the taskbar notification area for all users on the PC.

This way the Get Windows 10 app is not removed from the PC when disabled, and you will be able enable it again to use it when you like in the future.

The .reg files below will add/change the DWORD value in the registry key
HKEY_LOCAL_MACHINE\SOFTWARE\Policies\Microsoft\Windows\GWX

DisableGWX DWORD
0 or delete = enable tray icon
1 = disable tray icon

Steps to disable GWX  (Get Windows 10).

  1. Download the registry file here: Disable_Get_Windows_10
  2. Extract the .zip file to a reasonable location (e.g. your Desktop)
  3. Double click/tap on the “Disable_Get_Windows_10.reg” file to merge it (you can use the “Enable_Get_Windows_10.reg” to re-enable GWX if you want to undo disabling it).
  4. If prompted, click/tap on Run, Yes (UAC), Yes, and OK to approve the merge.
    UAC-registry
  5. Restart the computer to apply.

Original post based on this superuser.com post

Thank you Optmet.  I packaged his scripts into a .zip file and I modified the .bat file to automatically elevate (run as Administrator).
Windows10BlockerHider.zip

Save, extract, and launch the “BlockWindows10.bat”.  Hit “Yes” to allow the script to run as an Administrator.

Per the batch file as of 2015-06-02, the script removes the following KBs that are not specifically for a Windows 10 upgrade:

  • KB2952664 – Compatibility update for upgrading Windows 7
  • KB2990214 – Update that enables you to upgrade from Windows 7 to a later version of Windows
  • KB3022345 – Update to enable the Diagnostics Tracking Service in Windows
  • KB3035583 – Update enables additional capabilities for Windows Update notifications in Windows 8.1 and Windows 7 SP1

It also hides the above KBs from reinstalling through Windows Update.
If you want to uninstall/undo the Windows 10 blocker script, Google “Restore and install hidden updates” or use a tutorial such as this one to restore (unhide) the KBs listed above.

TL-WR841N v9 DD-WRT to OEM Factory Firmware to Gargoyle

This post is to revert from DD-WRT back to OEM firmware and then to Gargoyle.

As a long-time user and sporadic contributor to the open-source router communities, here is a quick post in converting a TL-WR841N v9 from DDWRT back to factory TP-Link firmware and then flashing the latest Gargoyle build.

Most of the steps come courtesy of this OpenWRT forum post (FYI – Gargoyle is based on OpenWRT).

Step 1: You must know first your hardware version as described here from TP-Link or here from OpenWRT wiki.  In this example, I am running v9 (same as v9.2).  Only do the following steps via Ethernet; not wireless.

Step 2: Download “stripped” TP-Link firmware here.  Stripped firmware removes the bootloader allowing the factory firmware to fit in place of DD-WRT (in this example).  Please pay careful attention to download the proper build for your version of the router (v5 vs v9, etc).  Extract the zip file after downloading.

Step 3: Get a copy of WinSCP and Putty .  I prefer portable versions.  You can also use telnet in place of Putty.

Step 4: Login to DD-WRT, under the “Services” tab and enable both telnet and SSH.  Save settings and reboot the router.

Step 5: Open WinSCP and use the following settings:
Host name (assuming default): 192.168.1.1
Port: 22
File Protocol: SCP
Username: root
Password: <your DD-WRT password>

Step 6: Copy the stripped firmware.
On the right side, browse to /tmp/
Drag-n-drop from left to right the extracted firmware image.  In this example it was “TL-WR841ND-V9-FW0.0.3-stripped.bin”.  It should show up in the /tmp/root folder.  Rename “TL-WR841ND-V9-FW0.0.3-stripped.bin” to “1.bin” to make life easier.

Step 7: Login with Putty or Telnet using the same host and credentials as above.

Step 8: Flash the stripped firmware.  Type the following commands:
cd /tmp/root
Confirm the file is uploaded correctly. Run:
ls
Hit the “Enter”. Confirm the 1.bin file is in the directory.
Next run:
mtd -e linux -r write 1.bin linux
Use whatever name you copied/renamed in Step 6.

Wait and be patient as the new firmware is flashed.  It should take ~3 minutes and I was able to see the progress via Putty/telnet.  Once the flashing is complete the Putty/telnet session should close and the router should reboot.

Step 9: Disable/re-enable your network adapter to get a new IP from the TP-Link firmware.  v9 had a default IP of 192.168.0.1.

Step 10: Flash Gargoyle firmware from the TP-Link firmware.  In the TP-Link firmware, go to “System Tools” on the right side and “Firmware”.  Then browse to the proper Gargoyle firmware.  In this case it was the current Gargoyle factory build for v9: “gargoyle_1.7.1-ar71xx-generic-tl-wr841n-v9-squashfs-factory.bin”.  Hit “Upgrade”.  Wait and again be patient for ~3 minutes which Gargoyle flashes.

Step 11: Enjoy!  Disable/re-enable your network adapter to get a new IP from the Gargoyle firmware which should be 192.168.1.1.  Remember: Gargoyle does not by default turn on wireless; you have to login to enable the wireless radio.

Seafile HTTPS Install on Windows Server 2012 R2; Step-by-Step

A step-by-step tutorial on getting a functional Seafile Windows Server that does HTTP/HTTPS syncing (port 443 only) running on Windows Server 2012 R2 with IIS 8.5 and Seafile Windows Server 4.0.6.

I cannot provide screenshots for every step. I am only documenting what I did, what issues I encountered, and what was my final configuration.  These steps were based off of this post by Jeffrey Tay.

Step 1: Install Seafile Server for Windows. Specifically “Download and Setup Seafile Windows Server“.

Step 2: Install IIS. Courtesy to Jack Stromberg and this post which covers the install in brief. Make sure you can access the IIS default page at http://localhost/ to confirm IIS is running correctly.

Step 3: Install Application Request Routing (ARR) 3.0. Another post by Jack Stromberg covers the install. Download ARR 3.0 and follow steps 1-5 from Jack’s post under “Installing IIS Application Request Routing (ARR) 3”.

Step 4: (Optional) Generate and install your SSL certificate. I hesitate to make this optional, but please go get an SSL certificate. Self-signed certificates were problematic for me with Seafile and the hassle was not worth it.  A kudos to my hosting provider, EZPZ Hosting, who offers free, basic SSL certificates or Godaddy, or NameCheap, or Comodo; all work for a basic SSL certificate.

I’ll refer you to GoDaddy which has a simple write-up for generating the CSR Request and importing the certificate back into IIS. On the right side of the IIS Manager is where you launch the wizard to get the process started.

Step 3: Create your Seafile site. Create an empty directory for the “Physical path:” and select the “SSL certificate” that you created and imported in the prior step.  Note: the screenshot shows “Not selected”. This is where you select your imported certificate.

Step 5: Create a web.config file in the “Physical path:”. Note: other examples on the internet did not properly add the appendQueryString=”true” for both Seafile rules. The web.config first checks if HTTPS is being used, if not it redirects to HTTPS, then it checks to see if it is using the “seafhttp/” subdirectory and reverse proxies to http://127.0.0.1:8082, and lastly it reverse proxies everything else to http://127.0.0.1:8000.

Download the following web.config file (which has clean indenting) or, using Notepad, copy and paste the following into a new web.confg file (Warning: make sure Notepad did not append .txt upon saving):

<?xml version="1.0" encoding="UTF-8"?>
<configuration>
 <location path="" overrideMode="Deny">
 </location>
 <system.webServer>
 <security>
 <requestFiltering allowDoubleEscaping="true" />
 </security>
 <rewrite>
 <rules>
 <clear />
 <rule name="Redirect to HTTPS" enabled="true" stopProcessing="true">
 <match url="(.*)" />
 <conditions logicalGrouping="MatchAll" trackAllCaptures="false">
 <add input="{HTTPS}" pattern="^OFF$" />
 </conditions>
 <action type="Redirect" url="https://{HTTP_HOST}/{R:1}" redirectType="Permanent" />
 </rule>
 <rule name="seafilehttp" stopProcessing="true">
 <match url="seafhttp/(.*)" />
 <conditions logicalGrouping="MatchAll" trackAllCaptures="false" />
 <action type="Rewrite" url="http://127.0.0.1:8082/{R:1}" appendQueryString="true" logRewrittenUrl="true" />
 </rule>
 <rule name="seafile" enabled="true" stopProcessing="true">
 <match url="(.*)" />
 <conditions logicalGrouping="MatchAll" trackAllCaptures="false" />
 <action type="Rewrite" url="http://localhost:8000/{R:1}" appendQueryString="true" logRewrittenUrl="true" />
 </rule>
 
 </rules>
 <outboundRules>
 <preConditions>
 <preCondition name="ResponseIsHtml1">
 <add input="{RESPONSE_CONTENT_TYPE}" pattern="^text/html" />
 </preCondition>
 </preConditions>
 </outboundRules>
 </rewrite>
 <httpErrors errorMode="DetailedLocalOnly" />
 </system.webServer>
</configuration>

Step 6: Check “Enable Proxy” under AAR 3.0.  Refer to steps 1-6 courtesy of this article from Microsoft.

Step 7: Enable 2GB large uploads (30MB is the default) in IIS. Open an elevated/ Administrator command prompt and run:

c:\windows\system32\inetsrv\appcmd set config -section:requestFiltering -requestLimits.maxAllowedContentLength:2000000000

See Option 2 from this IPSWITCH knowledge base article.

Step 8: Make sure your Seafile config files are properly set.

In “seahub_settings.py” change and make sure you do not have a trailing “/” after seafhttp.

FILE_SERVER_ROOT = 'https://<your-domain-name>/seafhttp'

In “ccnet.conf” change the following and I have a trailing “/”

SERVICE_URL = https://<your-domain-name>

Step 7: Restart IIS, Seafile, and go test your new, secured, HTTP-sync-enabled Seafile server.

An easy way to test the IIS rewrite rules for seafhttp is trying the following two URLs; adding or removing the trailing “/”. I came across these debugging URLs from a Seafile support forum thread. It identified an error in my web.config that I posted above that was missing the trailing “seafhttp/”.

http://<your-domain-name>/seafhttp

should return “Sorry, but the requested page could not be found.” with the typical Seafile login UI header and footer.

http://<your-domain-name>/seafhttp/protocol-version

should return {“version”: 1} as text-only with no images.

Before trying HTTPS, make sure you can get HTTP working.  Once trying HTTPS, make sure your 2102R2 machine has the correct time.  It must be accurate for HTTPS.  Use NTP.

Here are a few supporting URLs that may be helpful in debugging HTTPS syncing:
Can’t download any file over mobile device
Seafile Protocol: Are ports 8082, 10001 and 12001 safe and/or necessary?
upgraded to new client (4.2.0) bad response 404 for protocol version
Problems using Seahub on non-root domain
Client always tries /seafhttp/protocol-version
Lighttpd rewrite issue (v1.4)

Enforcing HTTPS & WWW prefix with Apache .htaccess redirects using cPanel

First post is simple.  I wanted a simple way to enforce both HTTPS (TLS/SSL) and the WWW prefix while gracefully handling whatever the user enters.

I am not going to get into the age old debate.  Every domain admin must make the choice.  The combination of sub-domain DNS round-robin, cookies, and the that every non-technical user expects WWW, I chose to redirect to the WWW prefix.  The wrinkle was I also wanted to enforce HTTPS.  After searching for a few minutes I cobbled together a working and flexible solution which does not hard code the domain name.  Kudos to this stackoverflow thread which did most of the heavy lifting.

RewriteOptions inherit
RewriteEngine On

#First rewrite any request to the correct one (i.e. adding "www." if it does not exist)
RewriteCond %{HTTP_HOST} !^www\.
RewriteRule ^(.*)$ https://www.%{HTTP_HOST}%{REQUEST_URI} [L,R=301]

#After checking and adding "www." if necessary, then rewrite to HTTPS:
RewriteCond %{HTTP:X-Forwarded-Proto} =http
RewriteRule ^ https://%{HTTP_HOST}%{REQUEST_URI} [L,R=301]

For those new to .htaccess configuration files (and since I am using cPanel) here is a simple article to get you started and how to apply the above config.

Speaking of cPanel/WHM and HTTPS, an honest referral to EZPZ Hosting.  Dan and his team have been superb since I became a customer back in 2010.  Their reseller accounts include unlimited free, basic SSL certificates.

EZPZ Hosting
ezpzlogo