This is a capture and summary of the most important information to own, maintain, fix, and preserve your Quadrunner 250 and/or King Quad 300.
I make no money off ads or referrals to Amazon or eBay. This is a labor of love.
The post will be updated over time to expand content. Thanks to many people who have contributed to this information over many years.
I highly recommend the following Facebook groups to connect with many helpful people. 1) https://www.facebook.com/groups/244782467277263 and 2) https://www.facebook.com/groups/2080390172247719
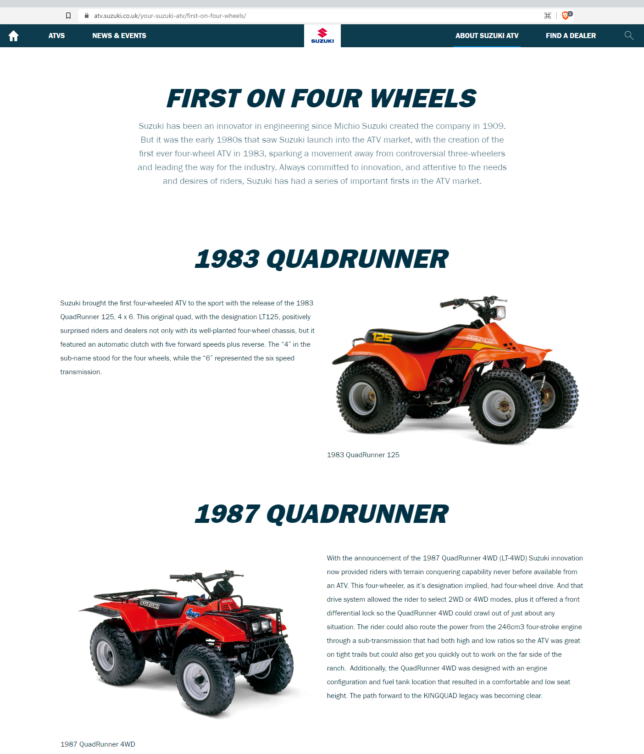
And thanks to Suzuki who recently posted this good image (as part of their “FIRST ON FOUR WHEELS“). PDF export from October, 2022.
Repair & Owners Manuals
Suzuki LT-4WD, LT-F4WD, LT-F4WDX, LT-F250 88-92 Condensed Service Data
Suzuki LT-4WD/LT-4WDX 1987-1998 OEM Official Factory Repair Manual 99500-42059-01E July 1997 (purchased on eBay and scanned/compiled)
Clymer Repair Manual ISBN 0892876433 (purchased and scanned high resolution with OCR)
Clymer Repair Manual ISBN 0892876433 (purchased and scanned high resolution with OCR)
Search email for saved links
Fun Facts
King Quad 300 is actually 280cc. Quadrunner 250 is 246cc.
Both have the lowest gear ratio ever put in a production ATV in “Super Low” range.
Which one? Quadrunner 250 vs. King Quad 300?
If you have 5-lug nuts on the rear its a King Quad 300. King Quad 300 had a longer stroke, additional clutch plate, oil cooler, slightly longer frame.
The Quadrunner 250 came as a 2wd (LT-F250) or 4wd (LT-4WD) versions.
The colors and names were used interchangeably depending on the country (e.g. Canada had a blue Quadrunner 300).
Changes through the years…
The 1987 Quadrunner had a one-year only rear u-joint axles which had a different spline count (refer to this thread or the OEM Suzuki repair manual for specifics at the back). 1987 had a one-year-only front and rear racks, square axle nuts, the fan mounts welded on the frame, and silver painted a-arms.
1987-1989, 1990-1999, 2000-2002 carburetor changes. See the carburetor section.
In 1999, the body entirely changed with round headlights along with other minor changes.
Decals changed almost every year. Rear racks changed slightly with a small plate for a “Suzuki” or “Quadrunner” logo.
Other Links & YouTube Noteworthy Videos
AUTOKAY Air Oil Filter Fits for Suzuki 1987-2001 Quadrunner 250 1991-2002 King Quad 300
Freedom County ATV FC166 Black Replacement Seat Cover for Suzuki LTF 250/ LT4WD QuadRunner 88-98, Suzuki LTF4WDX KingQuad 91-98
80 videos created by John Reid.
Amazing detail, close-ups, and helpful explanations. Compliments to John!

I may dedicate a post just for this video: my favorite from 1993!
1993 Suzuki Quadrunner 4X4 LT250 – Mud Bustin’!
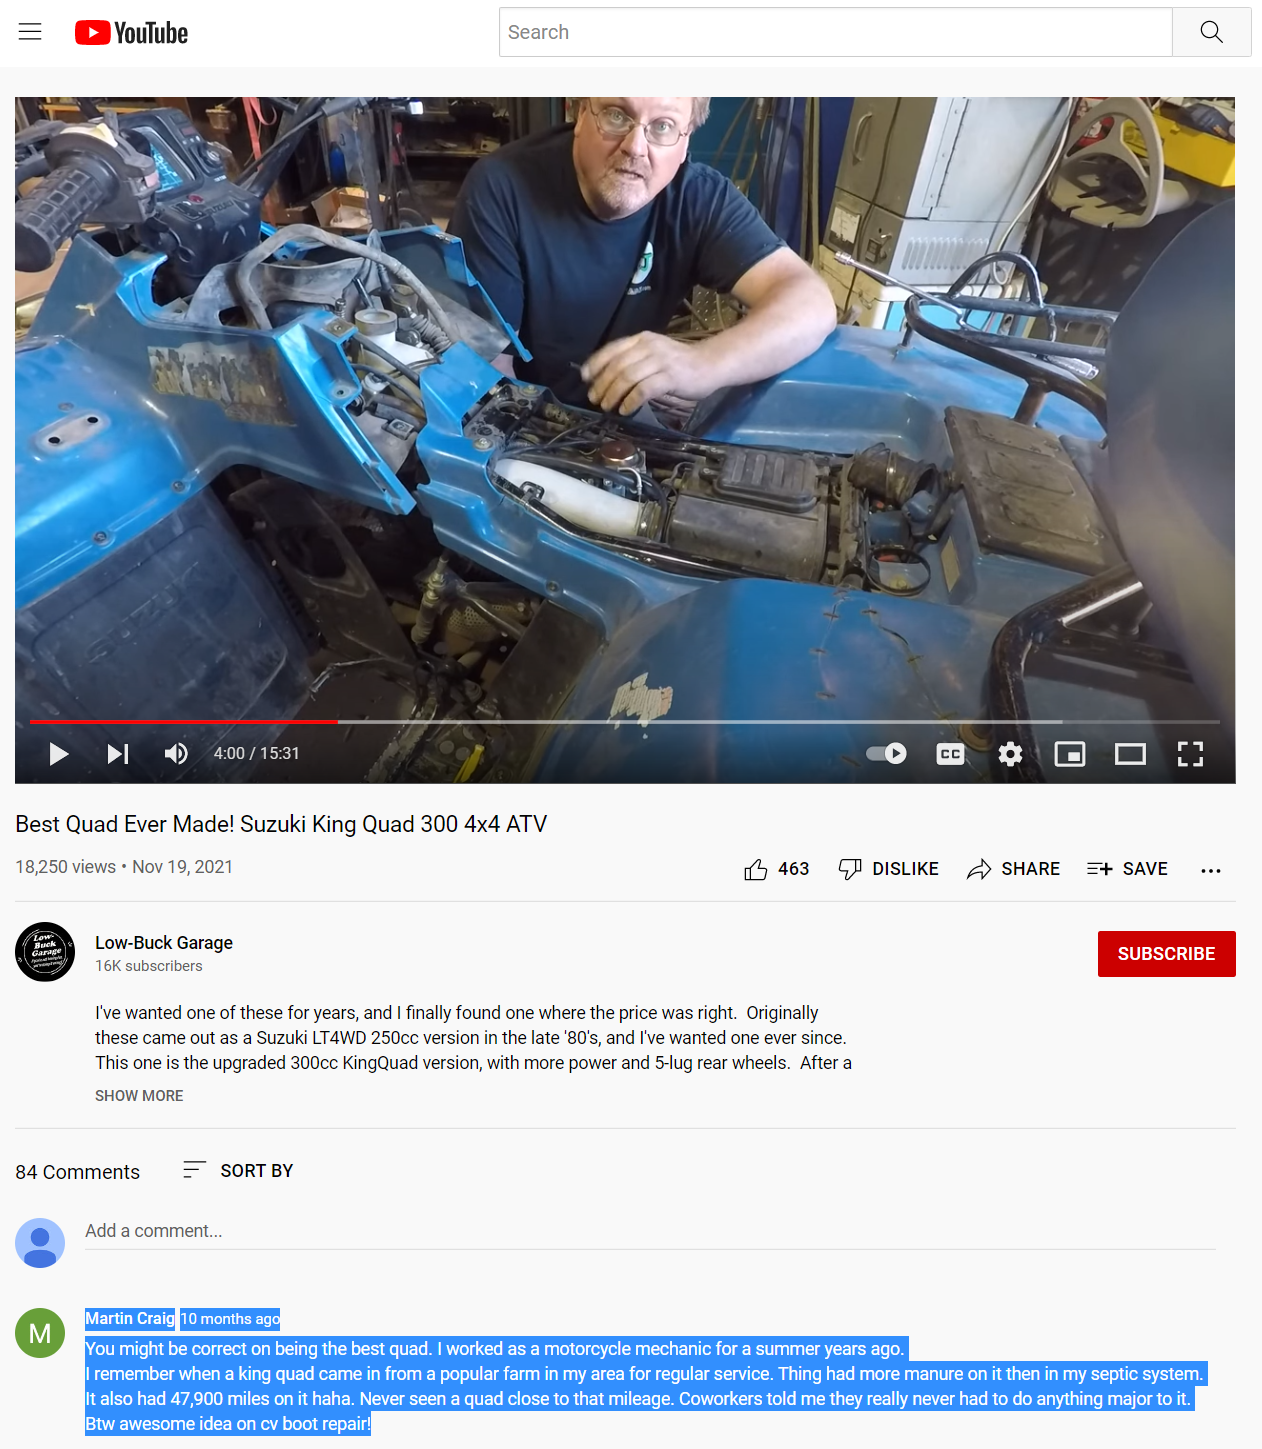
Best Quad Ever Made! Suzuki King Quad 300 4×4 ATV (included a screenshot as I enjoyed the highlighted comment).
1994 Suzuki Quadrunner 250 4×4 Tune Up | Carb Rebuild | Oil Change & Filter| New Grips | Spark Plug
King Quad 300 4×4 ~ An Atv Way Ahead of its Time!!! ~ RIDE & REVIEW
Suzuki Quadrunner 250 4X4 – DO WE LIKE IT?? Overview – Review AND WHY!!
Arctic Cat 300 vs Suzuki King Quad 300 ATV Comparison
Close-ups of engine and transmissions:
ATV engine seized up at max speed – full strip & inspection #1035
Suzuki LT300 engine strip Ep.2 Ft. Tool Girl Holley #1037
Suzuki Quad Runner 250 flood damage inspection #1966
Modifications
Suzuki King Quad 300 / Quadrunner 250 Lift Kit $19.95
Suzuki King Quad 300 differential lock mod (do NOT use diff lock in high range)
King Quad 300 Start in Gear Mod
I Built The World’s First And Only Lifted & Snorkeled King Quad 300
Suzuki Quad Modified Neutral Switch Fitting (John is amazing!)
Engine & Valves
Placeholder
Fuel Petcock
Do this for ALL models. For 1990+ models, please plug the vacuum line from the carburetor with a small bolt with Teflon tape and install a manual petcock.
Go to eBay or Amazon for “Yamaha 5HN-24500-01”. $25. Its worth it! Make sure the fuel outlet exit on the left side (most of the cheap ones are flipped).
Good summary video (where he purchased one with the exit on the wrong side): 1992 Suzuki King Quad 300 Fuel Petcocks (Non-Vacuum)
Carburetor
Refer to the OEM or Cylmer manuals for carb parts breakdown and settings.
Do everything possible not to use Amazon carburetors. Use a Shindy rebuild kit and clean the carb. See videos and table. If needed, use eBay and try to afford a used one.
1987-1989:
The 1987-1989 Quadrunner 250 used the Mikuni VM24SS (24mm) slide carb. Throttle cable enters the top. Uses a different boot into airbox compared to the 1990+ carbs.
Mikuni VM carburetor tuning guide. Great forum post showing pictures of the VM24SS and a forum post showing the many different carb components.
1990:
Beginning in 1990, the Quadruner 250 used the Mikuni BST31SS (31mm) CV carb. Throttle cable on the side with 4 screws on the top. This was the most often used carb based on the number of years it was used and sold units (however there is debate it was oversized – see here).
HOW TO – Clean Carburetor Carb Suzuki King Quad 300 Rebuild Kit Gas Fuel Cleaner GUMOUT 13200-19B92
1994 Suzuki Quadrunner 250 4×4 Tune Up | Carb Rebuild | Oil Change & Filter| New Grips | Spark Plug
If you want to consider a knock-off carb: Chinese Unbranded Knock-Off Carburetor VS Genuine Stock Carb – Detailed Video on the Difference
You can buy replacement diaphragms. E.g. for the 31mm carb:

1999:
In 1999, it still had the BST31SS (31mm) CV carb with four screws on the top. In 2000, the carb changed to the Mikuni BSR29SS (29mm) CV carb with two screws on the top holding down the needle spring. Good PDF of a forum post of the BST31SS vs. BSR29SS.
Shindy carb rebuild kits are recommended over other brands.
See table and purchase on Amazon or eBay.
| Shindy Rebuild Kits | Year | Part # | Carburetor |
|---|---|---|---|
| LT4WD 250 | 87-89 | 03-206 | VM24SS |
| LT-4WD QuadRunner | 90-96 | 03-207 | BST31SS |
| LT-F250 QuadRunner | 88-89 | 03-206 | VM24SS |
| LT-F250 QuadRunner | 90-96 | 03-207 | BST31SS |
| LT-F250 QuadRunner | 97-99 | 03-211 | BST31SS |
| LT-F250 QuadRunner | 00-01 | 03-214 | BSR29SS |
| LT-F250F QuadRunner | 99 | 03-211 | BST31SS |
| LT-F250F QuadRunner | 00-02 | 03-214 | BSR29SS |
| LT-F4WD | 97-98 | 03-207 | BST31SS |
| LT-F4WDX KingQuad | 91-98 | 03-209 | BST31SS |
| LT-F300F KindQuad | 99 | 03-209 | BST31SS |
| LT-F300F KingQuad | 00-02 | 03-220 | BSR29SS |
Fuel Pump
Always rebuilt the fuel pump. Older units (1987-1989) are easier to access with less fender plastic. ≥1990 can be done but you have to partially remove the fender mud flap. Up through 1998 (square headlights) use this kit and rebuild. You can do this while its still mounted. Unmounting is not fun. Remove the 5 Phillips bolts and rebuild.

If its ≥1999 (round headlights), then it has a plastic non-rebuildable pump. Buy this replacement pump.

Oil
Always, ALWAYS leave an air bubble in the sight glass.
I cannot overemphasize this enough.
ALWAYS leave an air bubble in the sight glass.
Why?
Because one fatal flaw of this machine is the vacuum petcock bladder or vacuum fuel pump bladder or the carburetor needle valve fail siphoning gas tank into the crankcase. I have seen this on multiple machines. The gas compromises the oil and you can easily burn the engine up or cause other issues with bottom-end crankcase issues.
Always convert to a manual petcock. See fuel section.
Always rebuild the fuel pump. See fuel section.
Always turn off the petcock when not in use.
Seeing the bubble in the sight glass is an easy check to verify the oil level has not changed (and has not increased with gas). If the bubble is gone, something needs fixed. Bubble=good. Do not use if you do not see a bubble.
Always use Rotella T6. These things run hot. Especially the Quadrunner 250 with no oil cooler (A small radiator fan is recommended — another topic I will writeup).
King Quad 300 Rear Diff Lubrication Plus Important Engine Oil Info Explained
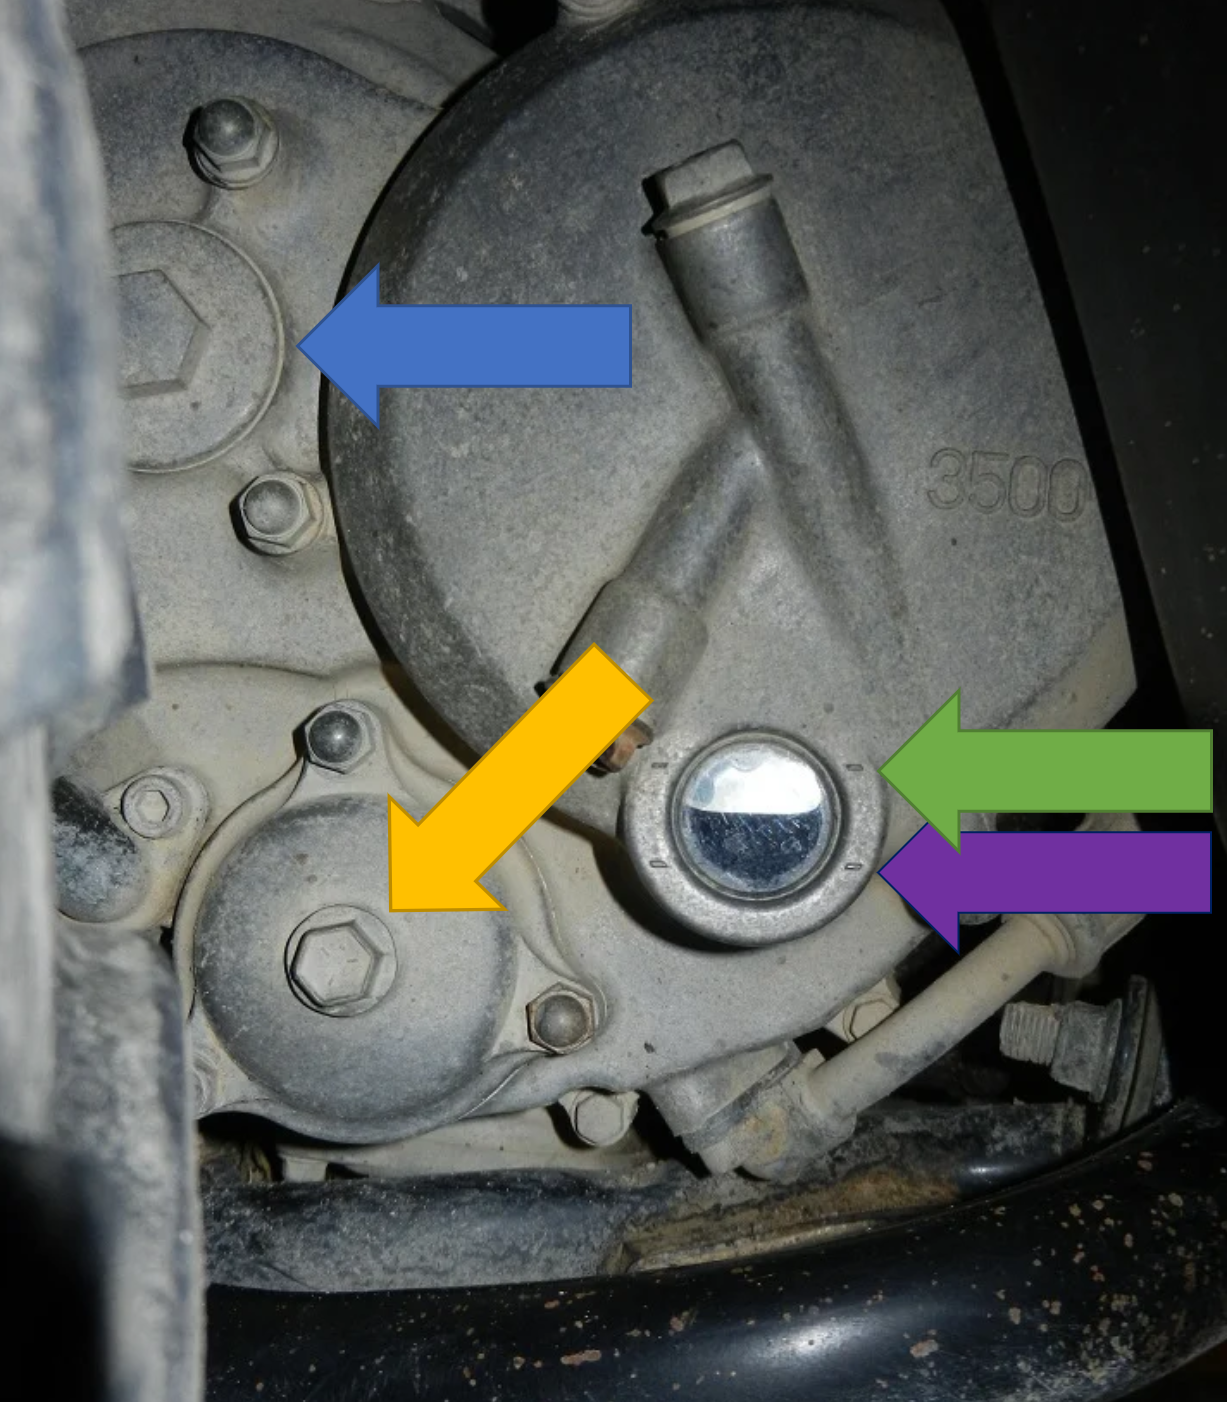
Transmission/Clutch
Clutch adjustment is easy and helps avoid “flat shifting” and excess wear on the clutch and gears/forks. See oil section and refer to the blue arrow for the 17mm cover.
Courtesy of TUBBYTUB with edits:
17mm bolt and inside you will find a set screw with 12mm lock nut. With your transmission in first gear, break the lock nut loose (to the left). Use a Phillips screwdriver and completely remove the set screw and lock nut. After you removal, take the lock nut off of the set screw, ensuring both move freely.
Once you have separated, put the lock nut back on the set screw just a few threads and reinsert the assembly back into the hole only using your fingers.
Tighten the Phillips screw where you feel it touch/drag on the clutch cage. While holding the set screw with the screw driver use your fingers and snug the lock nut up. Now double check the set screw and make sure it is just barely snug against the plates still, then loosen it about an 1/8 of a turn and use a wrench to slightly tighten the lock nut against the set screw. Do not over torque the nut but make it tight so it does not back off. Replace the 17mm cover nut.
Another issue I have seen on two different used machines I significantly restored (a 1987 LT4WD and a 1994 LT4WDX) is the clutch pack was seized and would never slip correctly. You can test this while riding: if you push and hold down the foot shifter assuming you are in 2nd gear or higher, the machine should coast. On both machines, they would not coast and immediately “flat shift” to the lower gear. This causes unnecessary strain on the shift forks, gears, and overall transmission as the momentarily slipping clutch discs smooth the shift.
A more controlled way to test this is to put the machine on a lift or blocks with the rear wheels off the ground and in 2WD. Push and hold the foot shift lever down (going from 2nd into 1st gear) and while still holding the lever down (and NOT in neutral) try to spin the rear tires forward. It will take a little muscle but the rear wheels should move or “free wheel” as the manual clutch pack releases. What is happening internally: the foot shifter linkage releases the spring pressure on the clutch discs allow them to correctly slip.
The solution? The clutch discs had seized together. I am not clear why but its a relatively simple fix. Pull the right side cover, reverse threads on the centrifuge clutch, and pull clutch pack and remove all the discs. Inspect discs and coat them in oil before reinstalling each disc. When reinstalling, make sure you properly align the shift fork as the cover is reinstalled and then readjust the clutch as discussed above. Enjoy!
Somewhat related: I originally thought it was the one way bearing but is it not. For reference there are two one-way bearings: 1) the starter gear behind the magnets on the left side (this causes the electric starter to slip or for the electric starter to spin all the time quickly wearing it out) and 2) inside the centrifuge clutch cage for engine breaking (this can be checked to make sure the wheels can spin forward in gear without the engine turning over).
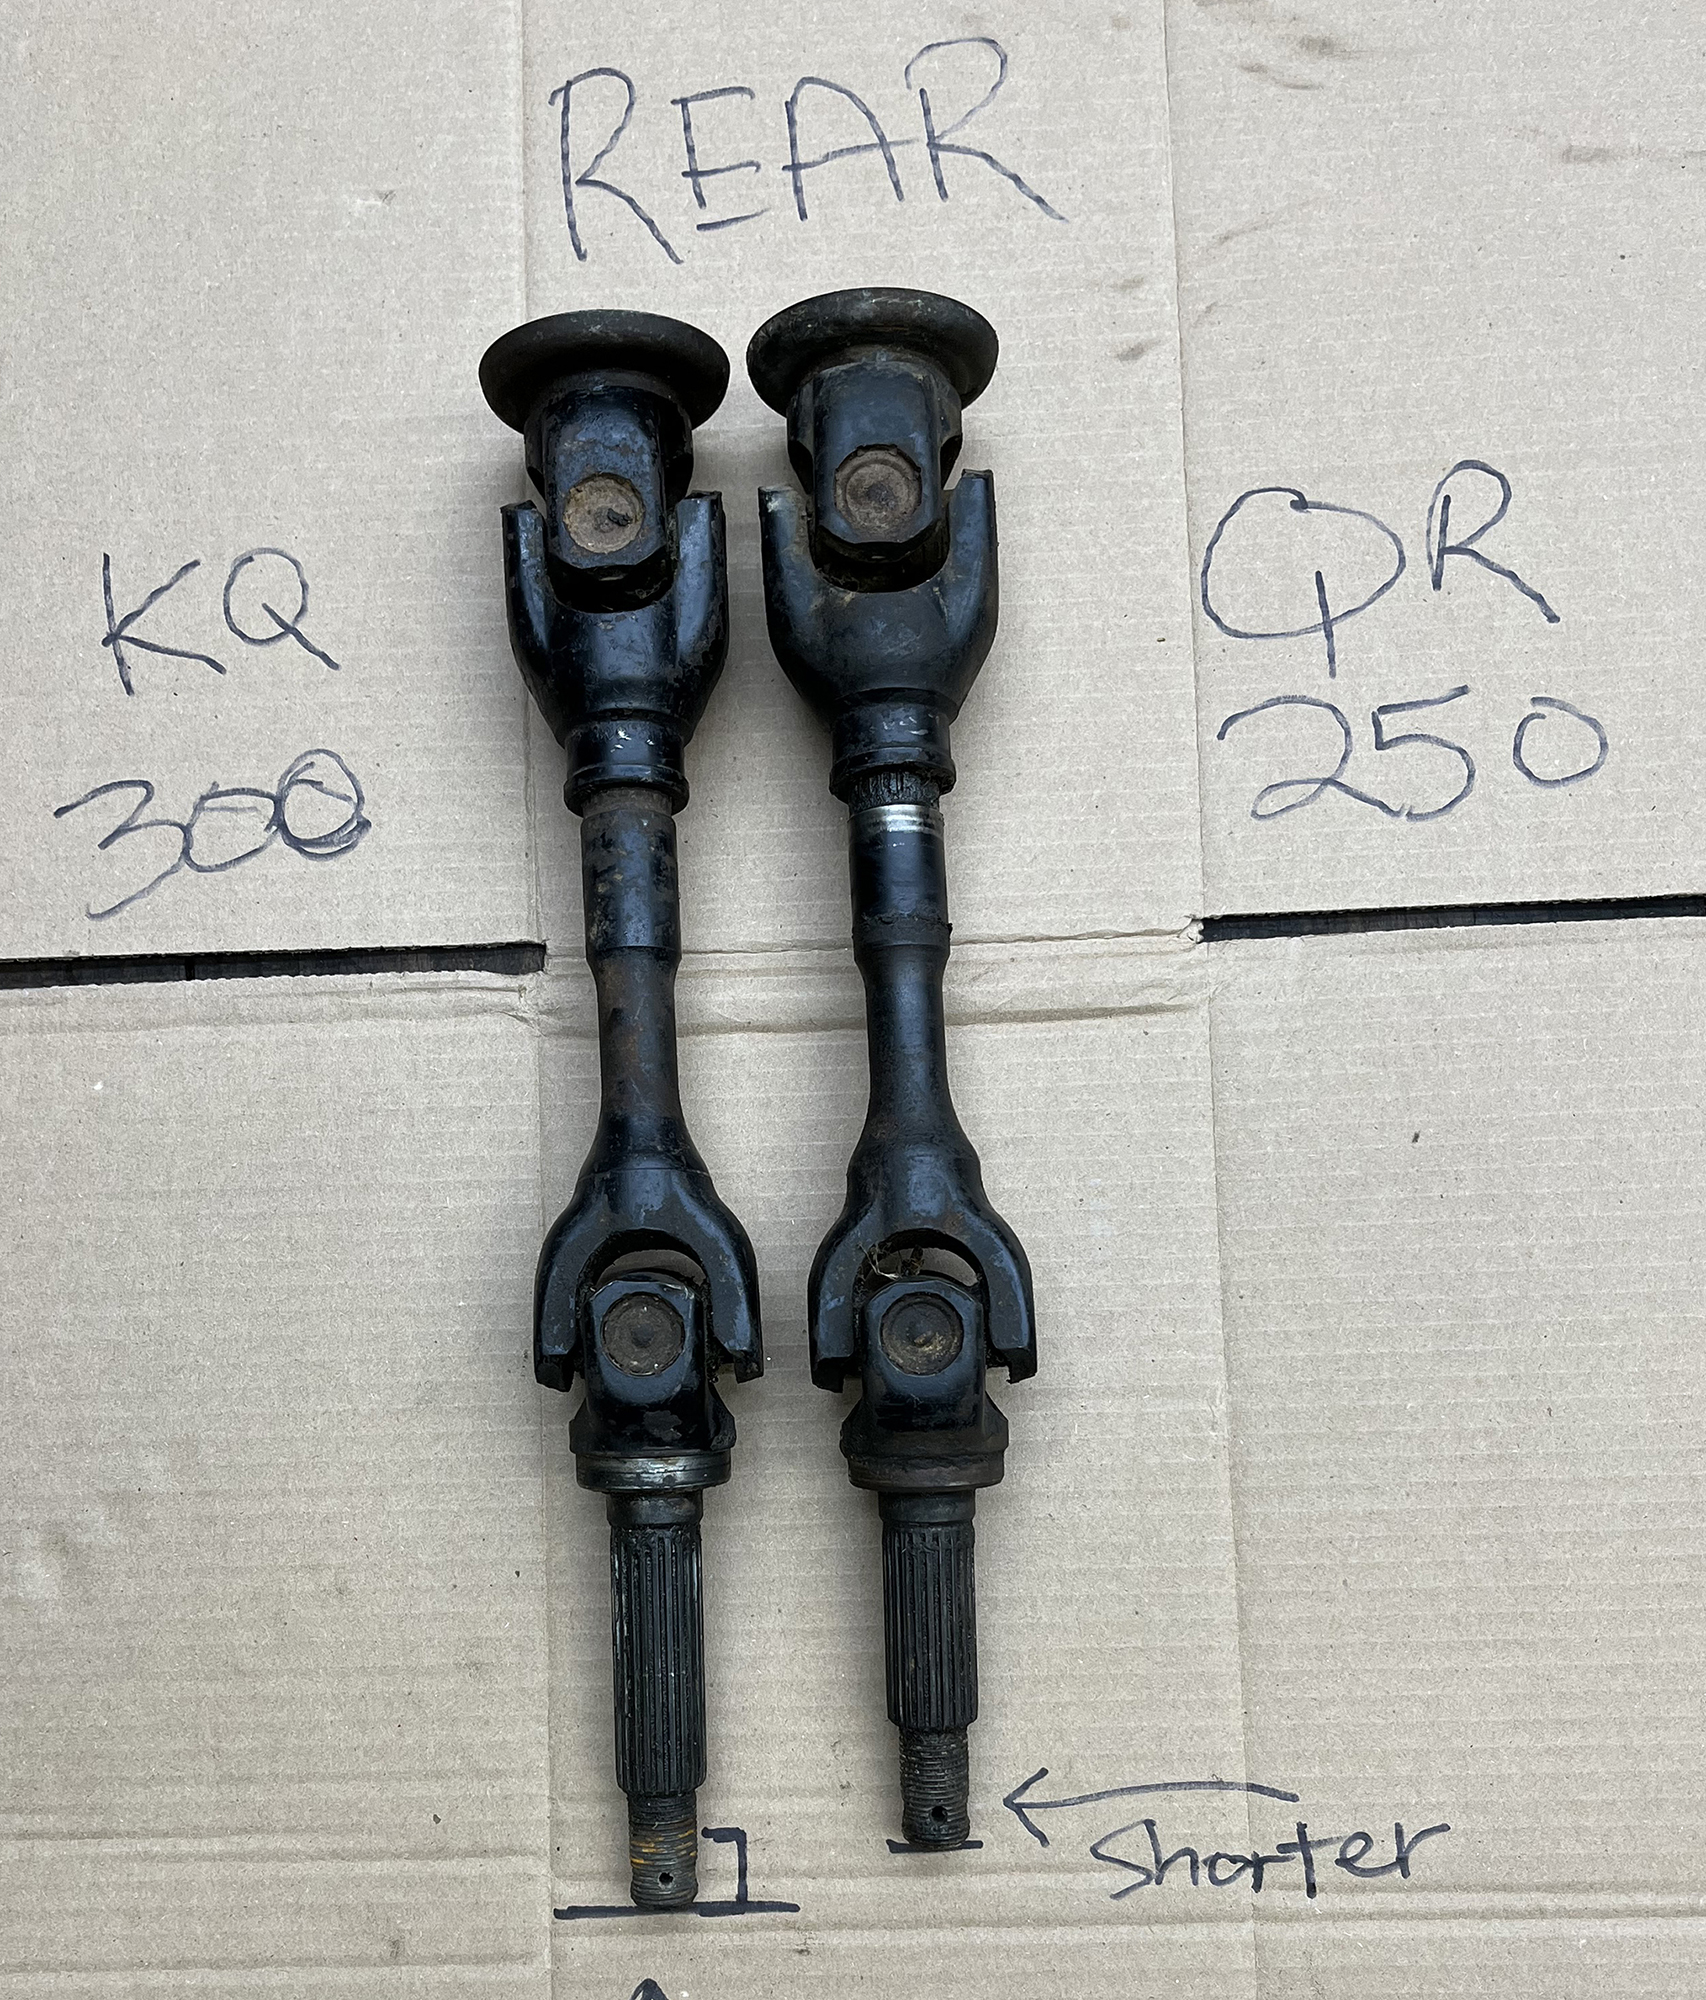
Axles & CV joints: Front and Rear
Axles seems to be a an area of confusion as Suzuki used a variety of different u-joints throughout the years. Still documenting more information.
CRITICAL: U-joint must be timed (or phased). In the simplest terms, the inner and outer u-joints must be matched. Refer to the manual for photos. See this video if you are curious on why and to see and hear it: Drive shaft velocity
IMPORTANT: Do not use greaseable U-joints due to inferior strength. There are multiple examples with supporting photos showing immediate failures along with further damage to U-joint yoke(s).
King Quad 300 and QuadRunner 250 complete axles are not interchangeable. However inner/outers possibly can swap.


QuadRunner Front: all interchangeable
1987: used u-joints for inner/outer
1988+: used CV joints for inner/outer. The outer joint can swap to a KQ300.
QuadRunner Rear: not interchangeable
1987: unique inner and outer joints. Splines: 20 and slightly smaller diameter.
1988+: interchangeable. Splines: 22. The inner joint can swap to a KQ300.
Later rear axles included a boot guard (#2) for a rubber boot to protect the u-joint.

Refer to this table I spliced together from Rockford.
This is for rear only. I have not found a good reference for the front axles however I believe they are more consistent throughout the years.
Please cross-reference this PDF with the specifications on page 2.
To rebuild the CV/u-joints, use the following kits: Suzuki King Quad 300 Rear Outer Axle Shaft REBUILD. Buy GMB brand or a “Made in Japan” brand.
For example, from Guillaume Gomer Chiasson on the April 24, 2023 Facebook group posted used the GMB 220-0045 Universal Joint.

The ujoints in my original rear axle were getting pretty worn out. So i decided to replace them. I know the best option is brand new Suzuki axles but at 350$ per side for the inner half and 400$ per side for the outter shaft, i needed tanother option. I found ujoints online listed specifically for the kq. So i went ahead and got some and replaced them. I don’t abuse my bike but after blowing at least 4 joints in a few months last fall after installing the first aftermarket ujoint i figured i needed a better ujoint. I finally found suitable replacement u-joints for the rear axle shaft for the King Quad. So far the GMB brand joints have that held up. In the picture in include side by side comparison of the ones that kept breaking and the GMB and you will see the difference in size. Also one is solid instead of hollow. The only problem is there is no clips to hold them in. The stock one are staked in. So first you have to find a way to get them out. The first one i pressed it out through the stakes and it is some hard to get them out. I also used the 4.5” grinder with a cutting wheel and with my plasma cutter to cut them out. Neither is pretty but you can get them out. Once out you have to file or grind out the stakes. Then you can intall the new ujoints. To hold them in you have to weld them in. I put in a first washer that is smaller than the caps as a shim to center the caps, then i weld in a bigger washer on top of it. I did one shaft last fall and haven’t had any issues yet. So i just did the other one. I might eventually do a third shaft as a spare.
I got my ujoints from Rockauto.com for about 13$ a piece.
For example, the GUT-24 U-joints are an option for ATV404 at 22mm/0.866″ diameter however the overall length or cross span is oversized. See screenshot however I think Alex incorrectly states the 22mm to inches conversation.

Additional posts in supporting the axle variations:
1) Rear Drive Yoke Spline Count??HELP (’87 LT4WD)
2) Axle spline compatibility – 90s into 88
3) 1988 250 Quad Runner Universal Joints
4) sourcing solid kq u-joints
5) 2000 u joints
CV Rubber Boots & Wheel Bearings
87s axles are there own. 88-96 can swap aswell with the king quads. You'll have to find an 87 axle that's good, repair the joint, or swap out the final drive axle aswell as the outers and hubs to use the 88-96 ones.

what I do know for sure is the front inners are for 87s only aswell cause they are ujoints not CVs, my friend with an 88 is always going through boots, so I make fun of him for it.

1990 onwards is interchangeable but 87, 88, 89 are all unique from what I remember. Repair manual is worth it.
There are two different CV diameters changing the cage and rubber boot! Be careful when ordering and check your bell housing ahead of time. If you going to the hassle of doing the inner, do the outer at the same time as its 80% of the work. The inners often fail first. Courtesy of JustRandy:
I spent hours searching online and calling salesmen to finally figure out what someone, somewhere should have said a LONG time ago. 68LAC is 2.5 inches ID and 71LAC is 2.75 inches ID. Now when someone is searching for a CVboot, they can find the info they need.

Just measure the CV bell (the part next to the differential). If its 2.5", you need the 68LAC boot. If its closer to 2.75", you need the 71LAC boot. I have a 1998 and 2001 king quad that measures 2.538" and a 1990 LT4WD that measures 2.720".

Personally, I think either boot would fit either joint. The smaller boot would stretch over the bigger joint and the bigger boot would clamp down on the smaller joint, but they make a big deal out of it when you order boots.
Summary from EPI:

Summary from EMPI 2019 CV boot manufacturer:

Per the chart, the inner diameter is what changes. The blue highlights measure 2.75″ (1987 had no factory boots). The green is 2.5″. EMPI does not have the 2.5″ inner.
Add a note on how to pull axles straight out
Two different size CV axle boot diameter inner bell housings.
Suzuki QuadRunner 250 – CV Boot Ripped – MUST WATCH – Axle Removal
How To: Suzuki King Quad 300 Rear Wheel Bearing Change
Electrical – CDI 1987-1989 LTWD vs. 1990+ Quadrunner & King Quad 300 Differences
1987-1989 has 7-wire magneto, 7-wire CDI, and voltage regulator
1990+ has the same voltage regulator and magneto. There were different CDI part numbers over the years 1990+ but they have the same pinouts. The CDIs are different between the King Quad 300 and Quadrunner 250. The Quadrunner 250 has a higher rev limit. I have not tried interchanging the CDIs.

CDI wiring:
| 1987, 1988, 1989 | 1990+ QR250 and KQ300 |
| W/L: Ignition Coil L: Goes to Mag (trigger) B/R: Goes to Mag B/W (charge) B: Goes to Mag (trigger common) G: Goes to Mag G/W (charge common) B/Y: Ignition Switch B/W: Ground | W/L: Ignition coil G: Goes to Mag, trigger B/L: Goes to Mag, charge — — O: Ignition Switch B/W: Ground |
NOTE: The charge and trigger circuits are isolated AC circuits for 1987-1989. It is unknown if either of the “common” wires are grounded inside the Mag. If, for example, G and B are both grounded, you could use a 1990 CDI and just ignore those wires. This is not known. With both being AC, it is also possible the non-common wires are tied to ground allow 1990+ CDIs. Reference: 89? quad runner 250 2×4 weird spark
FUN NOTE: the CDI triggers every rotation. 1 spark per revolution. As a 4 stroke it sparks every time at TDC and wastes a spark on on the exhaust stroke. Reference: Tach Oddity
Electrical – Voltage Regulator
Common failure: voltage rectifier overcharges causing poor CDI performance and prevents revving up. If your machine runs better (e.g. only revs up) with lights on, its a common failure that you voltage rectifier is failing.
Check voltages while running. Idle around 12.7v and 3/4 throttle around 14.5v. If it overshoots and goes upwards of 15v it’s faulty and needs replaced or has a bad ground. The regulator is underneath the front plastics. You need to take your time and remove the front plastics to replace.
NOTE: the regulator is very sensitive to a bad ground. If this ground is not good, the regulator will output a higher voltage “thinking” its outputting the correct voltage. Check this first. A common fix is to splice into the ground wire on the voltage regulator pigtail and crimp a ring terminal and attached to one of the voltage regulator mounting M6 bolts to the frame.
It is common to replace the voltage regulator. I usually replace with an OEM. The 1987-1989 has an additional wire. In studying the 7-wire magneto, I am not clear why the voltage regulator needs an additional wire. I suspect the early voltage regulators use the O/B wire to “enable” preventing battery drain when the key is “off”. If this is the reason, a new voltage regulator should work with issue.
Yerbay Starter Solenoid Relay for LTF250 LT-F250T Quadrunner 250 1988-2001 ATV
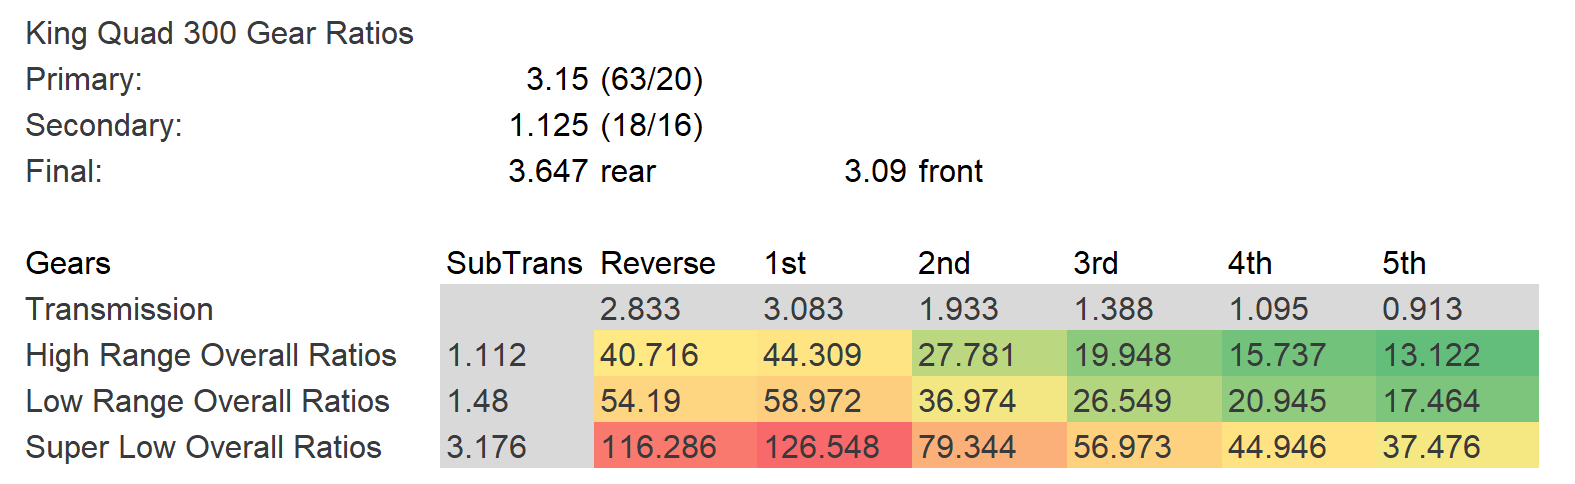
Wheels, Tires & Gear Ratios
Both the KQ300 and QR250 have different wheel and tire sizes front-to-back with unique hole spacing limiting aftermarket or other wheel options.
IMPORTANT: Do not change tire sizes. The front/back ratio is part of the drivetrain.
Larger tires also reduce overall performance due to weight and gearing. Keep the stock sizes. Trust me. I tried it and reverted to original wheels and sizes.
Multiple companies make the same tire in different sizes. Kenda Bear Claw being a popular option. The front differentials are the same between the QR250 and KQ300. The front output shaft gearing is different keeping the ratios correct.
NOTE: the offset is different between the QR250 and KQ300. The KQ300 front wheel will not work on the QR250 without lug spacers.
LT4WD: 3″ difference (22″ front vs. 25″ rear)
LT4WDX: 1″ different (24″ front vs. 25″ rear)
QR250 secondary ratio: 1.062 (17/16)
KQ300 secondary ratio: 1.125 (18/16) [Different bevel gears. 1 tooth less on KQ300]

| SUZUKI | OEM TIRE SIZE | BOLT PATTERN | WHEEL OFFSET | LUG NUTS |
| LT-250F 2WD, 89-02 (F) | 22x8x10 | 4/140 | IS | 10×1.25mm |
| LT-250F 2WD, 89-02 (R) | 24x11x10 | 4/140 | SA | 10×1.25mm |
| LT4WD 4WD, 88-02 (F) | 22x8x10 | 4/140 | IS | 10×1.25mm |
| LT4WD 4WD, 88-02 (R) | 24x11x10 | 4/140 | SA | 10×1.25mm |
| LT4WDX LT-F300F 4WD King Quad, 91-03 (F) | 24x8x11 | 4/140 | IS | 10×1.25mm |
| LT4WDX LT-F300F 4WD King Quad, 91-03 (R) | 25x10x12 | 5/160** | SA | 10×1.25mm |
All differentials were the same. The part numbers differ QR250 vs. KQ300 for the bevel gear running the front output shaft. Either its a different ratio for the 1″ vs. 3″ is “close enough” or the ratio is indeed different.
One of the most distinguishing features is the wide range gearing options.
From 13.122 in High Ranger, 5th gear to almost 10 times the torque of 126.548 in 1st gear in Super Low range.
Brakes
Do NOT attempt to ride if a wheel is dragging. The gearing is low enough you can snap an axle. Do not do it. You will not break something before freeing the wheel.
Front Brakes
Front brakes often freeze up, especially when riding in water during winter. Often the fix is replacing the wheel cylinders. They are exact match for the “Dorman W37850 Rear Drum Brake Wheel Cylinder Compatible with Select Geo / Suzuki Models“.
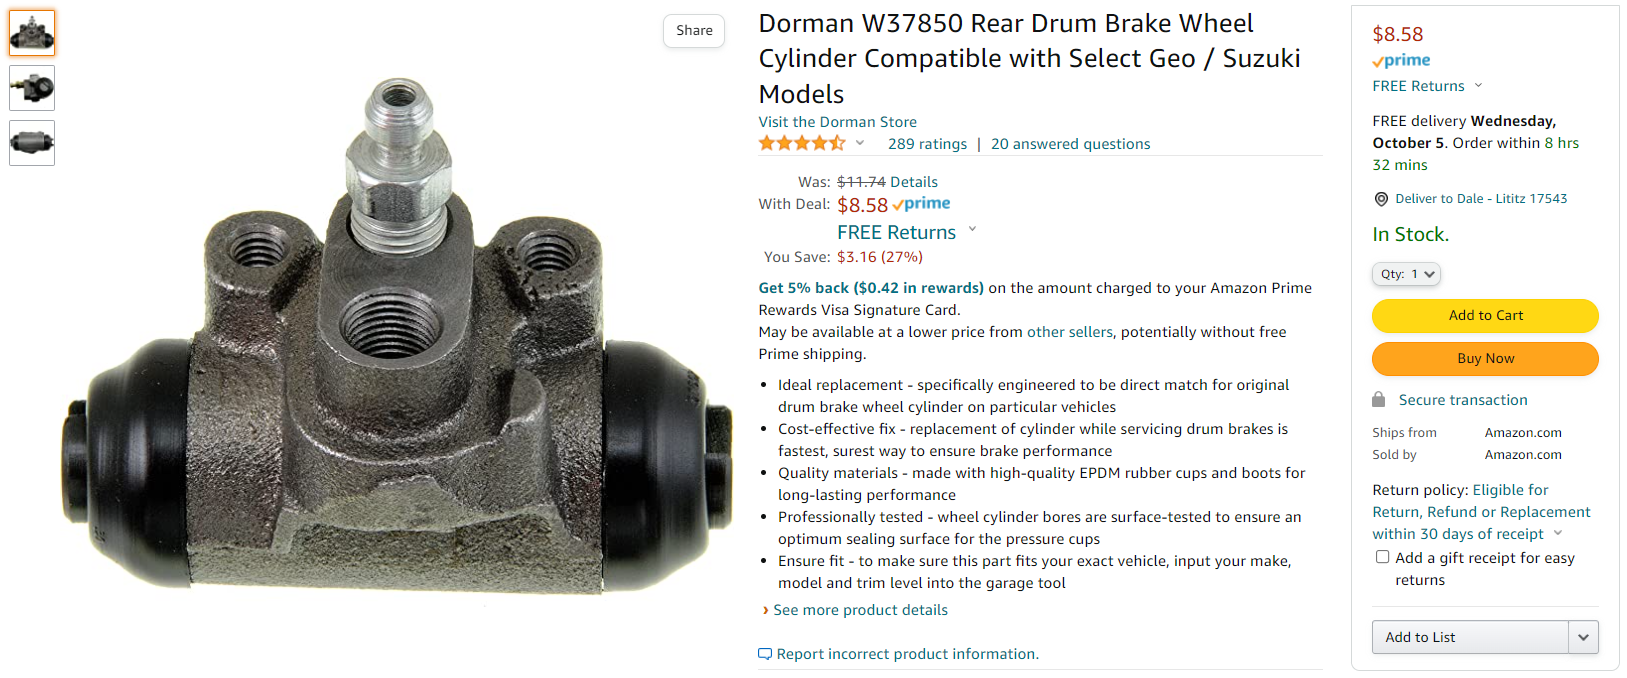
How To: Suzuki King Quad 300 Front Brake Job + Wheel Cylinder Replacement
Rear Brake
With no differential in the rear (both axles connect directly to the final drive gear), there is only one brake on the right side. Most braking is done with the front brakes and rarely does the rear shoes need replaced.
Rear Brake Shoes that fit all years: Brake Shoes fit Suzuki LT4WD 250 Quadrunner 1987-1992 Rear by Race-Driven
How To: Suzuki King Quad 300 Rear Brake Job Shoe Replacement
4×4 Front Differentials & Suspension
Change your gear oil.
How To: Suzuki King Quad 300 Differential Oil Change (2020 Maint. Series)
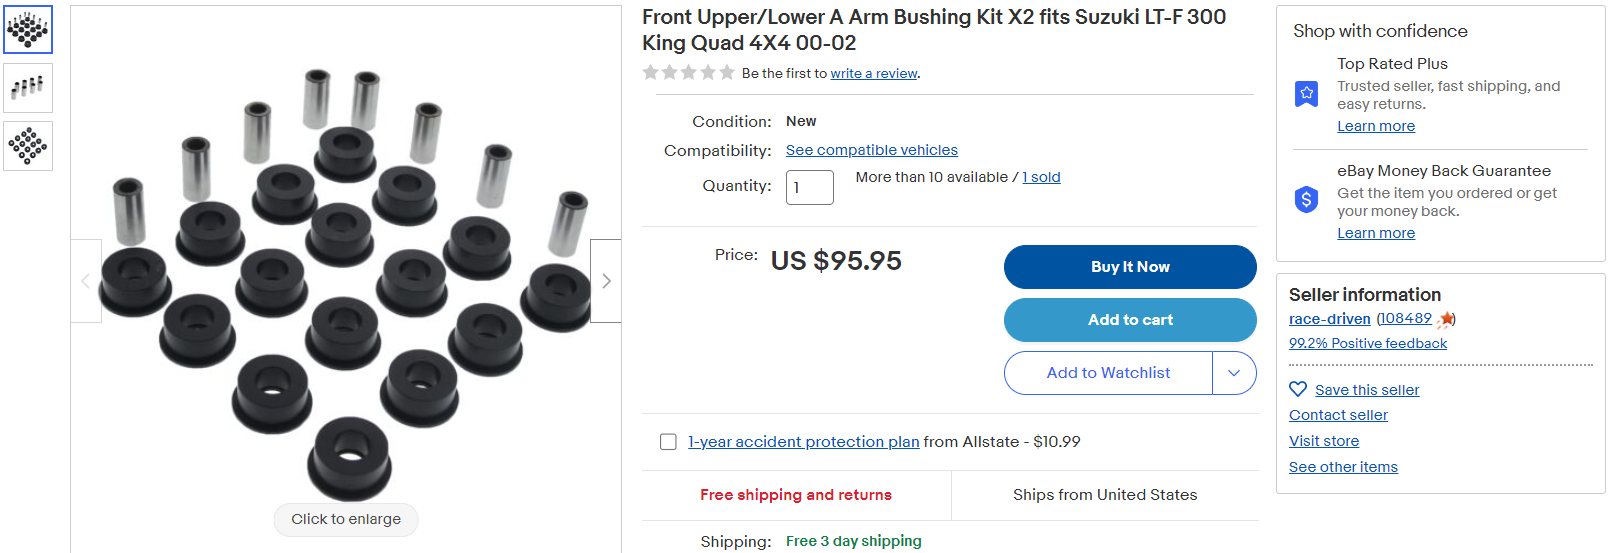
Kit to replace “Front Upper/Lower A Arm Bushing Kit X2 fits Suzuki LT-F 300 King Quad 4X4 Quadrunner 250“ is available.